GETTING STARTED
Apilogy is a digital marketplace that provides various APIs with diverse functions and capabilities, which can help developers and startups to concentrating on building new business opportunities while focusing on the time-to-market strategy. Fundamentally, Apilogy help developers to create ideas new ideas and bring them into reality. Apilogy also serves as a universal on-premise big data analytics solution and platform for enterprises. Apilogy generates insights related to enterprise’s operational and business needs in order to support decision-making, governance, strategy, and growth.
With this documentation, you will be familiarized with Apilogy to find, use, or publish APIs.
Overview
API, or Application Programming Interface, is an interface consisting of commands, functions, and protocols, that allows one platform communicate with another platform. API defines the function inside along with how to use, what format to use, what input to provide, and what output will be given.
The image above illustrates the concept of API, in which API acts as an intermediary between an application running on a device and a backend that provides a particular function or capability. Interface API will receive requests from the application that will later be forwarded to the backend API to be processed. The processed results will be returned to the initial interface API. Altogether, everytime the application needs particular data or runs certain function, the application will make an API call to the API service provider
Why is API important?
As the applications developed by developers are getting more complex, it would be inefficient if they have to build all functions while the required functions are available whether it is free or paid. The focus of the development abide by the time-to-market strategy, therefore developers must be able to think strategically and focus on developing the core functions while the supporting functions can simply use modules that are available as Open API.
Apilogy has found the common developer problems regarding the matter above are:
1. Struggle to get ready-to-use API services;
2. Limited developing and integration time; and
3. Limited self-service API services.
As an answers to the problems faced by developers, Apilogy as an API marketplace or repository facilitates and brings together business owners, companies, developers, and startups to be able to use various API capabilities based on the needs of application, products, or services development, in a safe and scalable environment system.
API Basic Call
When using API, you will need to go through an authentication process that will verify that you have the rights to access and utilize the API. Initially, application will need to use cookies method that will save session ID in the application server to verify the user access. As a result, developers need to have multiple server with mulptiple session management to provide a unique storage databases for each application server.
You can solve the session ID storage management using a API-Key method. By using this method, you can reduce the server load, gain more flexible access management, and support distributed cloud-based systems or infrastructurs.
API-Key will be generated when the verification process by using credential has been successfull performed. Apilogy allow you to use API-Key based on username and password pairing or key and secret key pairing. After succesfully generate the API-key from the authentication result, you can use it to make an API call.
HTTP REST
REST (Representational State Transfer) is a set of attributes that allows an application to access many resources in a well-distributed way. REST can exchange multiple format, such as XML and JSON. Usually, REST uses HTTP protocols to perform the data exchange process.
REST API are stateless, meaning that every call can be made independently and never relies on information from your previous request. Each session will only includes information necessary for the server to fulfill the request, from the moment you make a request until the server replies with responses.
Because of its stateless characteristic, you will need to add information as part of their status indicator. The information are in the form of API-Key and need to be added to the HTTP header.
All APIs in Apilogy can only be accessed using REST services with specific HTTP method for CRUD (Create, Read, Update, and Delete) operations, which are:
• GET: Used to retrieve resources based on queries and fliter from the client.
• PUT: Used to update or modify existing resources
• POST: Used to create new resources.
• DELETE: Used to delete resources.
Authorization
Apilogy uses API-Key authentication as its authentication framework. Authorization is granted after confirming your identity using an API-Key that includes a key and a secret. This key pair is generated on the Authentication Key tab for each application on the My Account page.
All APIs requests in Apilogy must include the authorization parameter in the HTTP header, following the format X-API-KEY: Value. Otherwise, key will be invalid and the response will return either 401 Unauthorized or 403 Forbidden.
Header
All API request in Apilogy must comply with the HTTP standard along with its mandatory header that must be inserted in every API call.
The standard format are:
Accept: application/JSON
Content-Type: application/x-www-form-urlencoded
Authorization: X-API-Key
You may expect to receive the following responses:
200 – OK
3XX – Redirect
400 – Bad request
401 – Unauthorized to access
403 – Forbidden
404 – Not Found
405 – Method Not Allowed
404 – Request not found
500 – Internal Server Failure
502 – Bad Gateway Error
Account
All APIs in Apilogy are protected resources, meaning access and transaction records are necessary for audit trail and traffic management. You will need to have an Apilogy account to be able to use the APIs in Apilogy. You can register in Apilogy without any billing charge. Ensure you are using a valid and accessible email address when creating an acount in Apilogy.
By creating an account in Apilogy, you may:
1. Have the rights and access to try out or use an API through our web console in https://apilogy.id/apis;
2. Access the account management feature and perform any activity as an API consumer, such as create application, subscribe or unsubscribe API, monitor usage on API dashboard, view billing transaction, update your profile, and other API consumer activities; and
3. Can participate in any promotional program and community event.
Otherwise, you can only explore APIs through our Explore menu.
MANAGING ACCOUNT
To start using API in https://apilogy.id/, you will need an Apilogy account. Creating an account in Apilogy is free and you will only need a valid and accessible email address.
By having an account, you will be given access to a dashboard to subscribe and manage APIs.
Create Account
Go to https://apilogy.id/ and click the Register button on the right corner of the page to start creating your account.
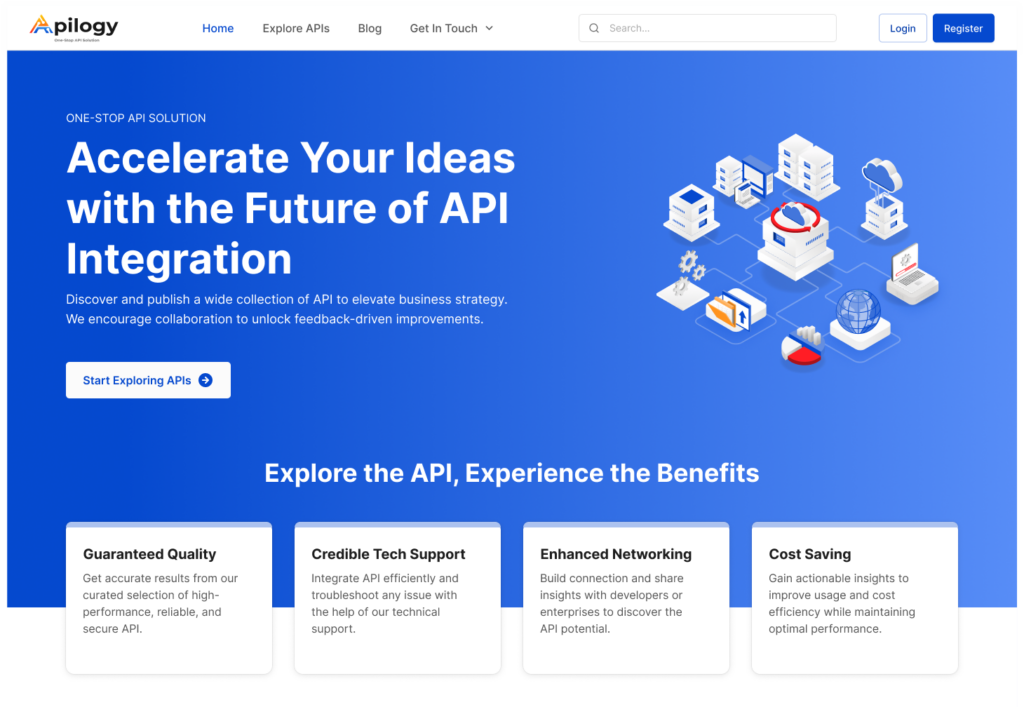
On the Register page, enter all your required information, which are Full Name, Phone Number, and Email. You will also need to create a username and a password for your Apilogy account. Make sure you have followed the requirements for the password.
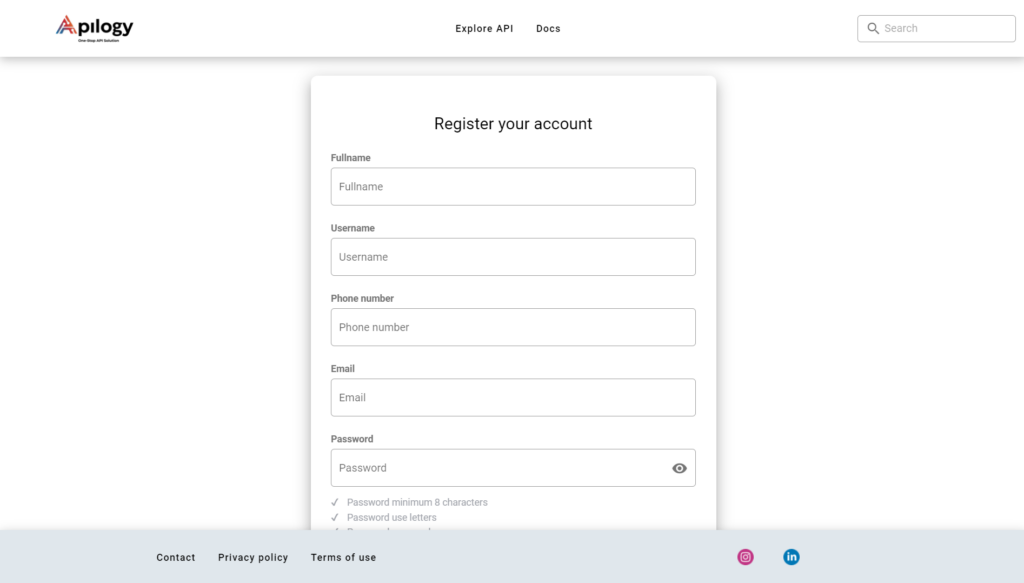
Click the check box below the form if you have agreed to our Term and Conditions and Privacy Policy. Click the Register button and an email to verify your registration on Apilogy will be sent to your registered email address.
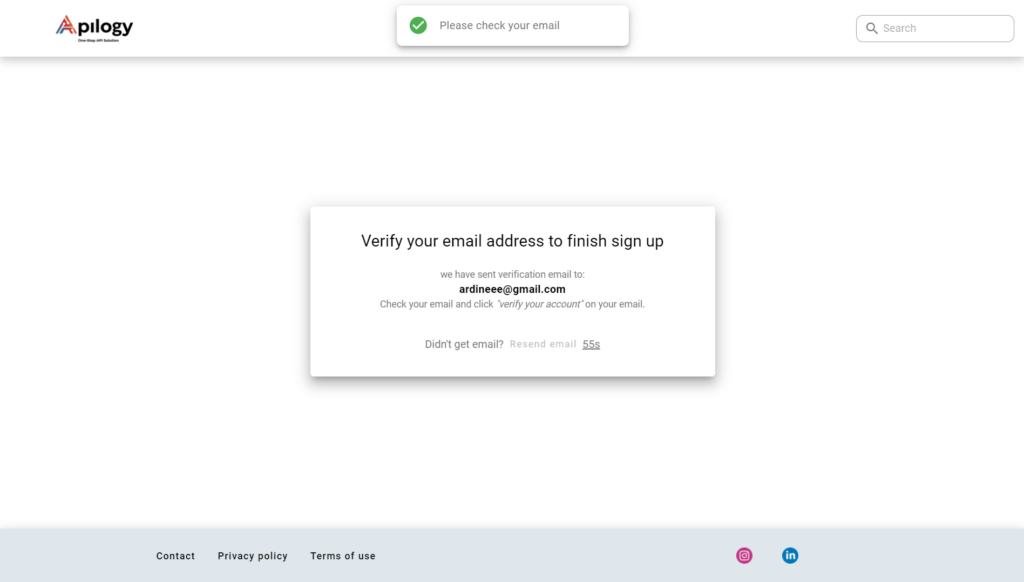
You can now login to your account if you have successfully verify your account by clicking the link on the verification email.

Log In to Account
Go to https://apilogy.id/ and click the Login button on the right corner of the page to log in into your account.

Enter your username or registered Apilogy email and your password. Click Login.
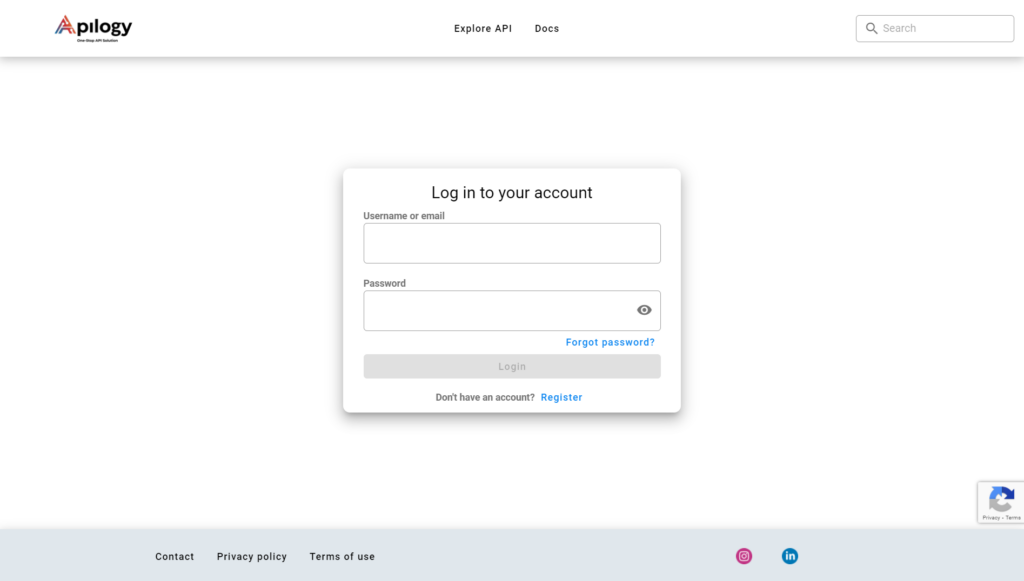
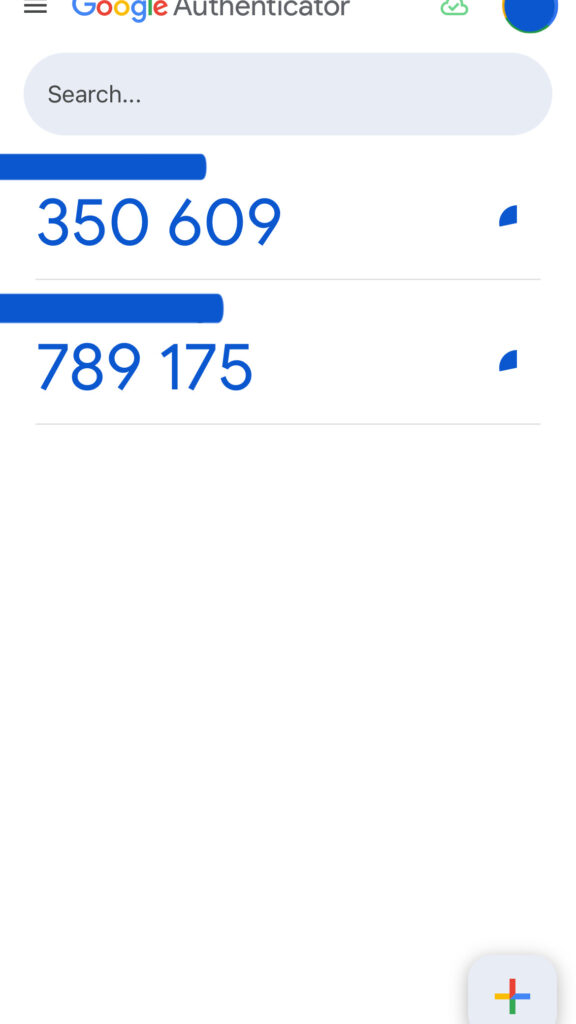
On your first login activity, you will immediately need to set up a Two-Factor Authentication settings for your account security. Start by downloading the Google Authenticator app in your phone. Open the app and click the + button on the right bottom corner dan select Scan a QR code.
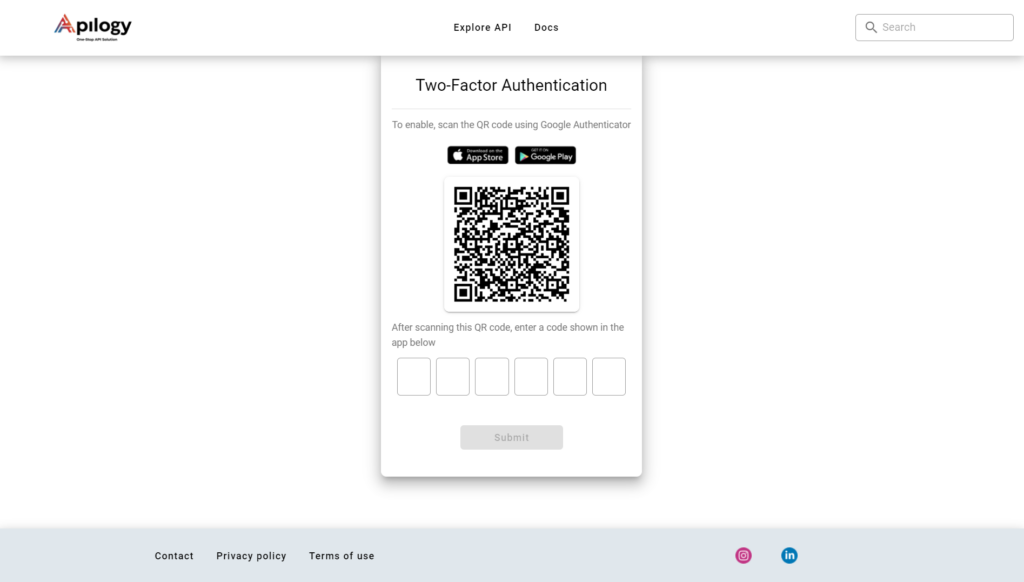
Then, scan the QR code displayed in the Apilogy page.
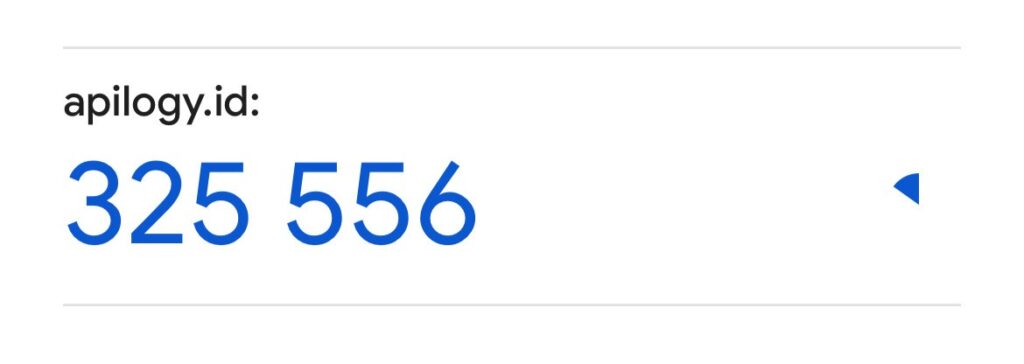
Enter the 6-digit code that is shown in the app and click Submit.
You will need to enter a different code every time you log in into your account because the code in the Google Authentication app will renew every 60 seconds. Start exploring your Apilogy account after you have successfully get in to your account.
Forgot Password
If you forget the password for your Apilogy account, click Forgot password? on the Login page.

Enter your email that used when you registered your account in Apilogy and click Send Email.
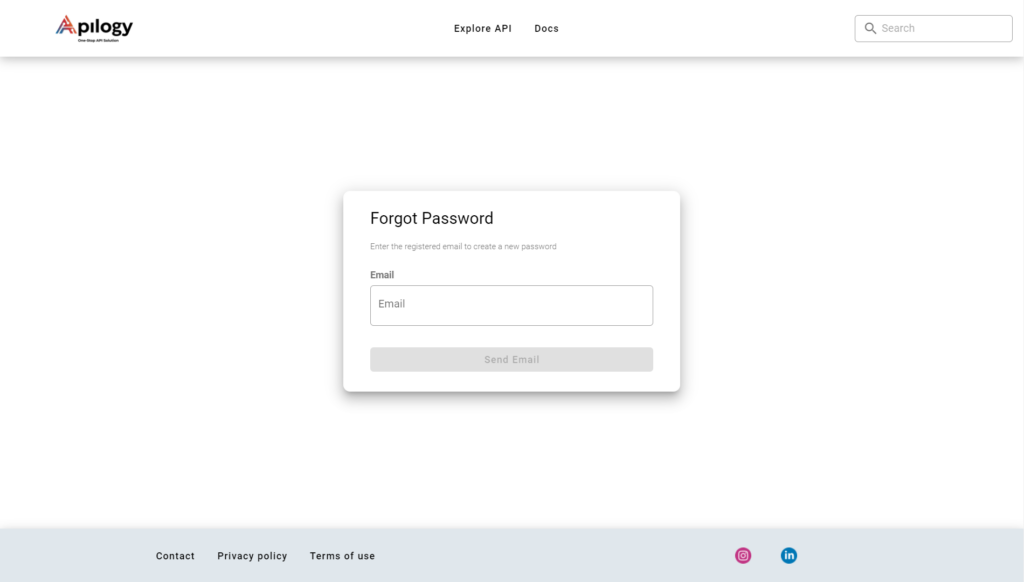
Apilogy will send you a reset password email. Click the Forgot Password Link on the email to setup a new password for your account.
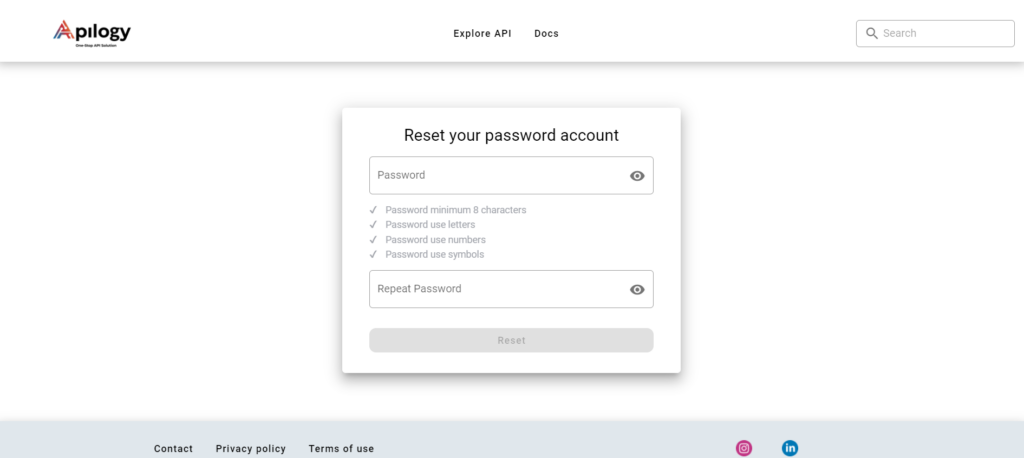
Enter your new password on the Reset Password page and make sure the new password follow our password requirements. Click Reset to finish updatin your password.
Reset 2FA
On your first login, you will need to set up a Two-Factor Authentication settings for your account security. 2FA in Apilogy will require you to have a Google Authenticator app in your phone. Every time you login into your account, you will need to enter the 6-digit code from the Google Authenticator app. If you failed to enter the right code in 3 attempts, you will need to reset your 2FA settings.
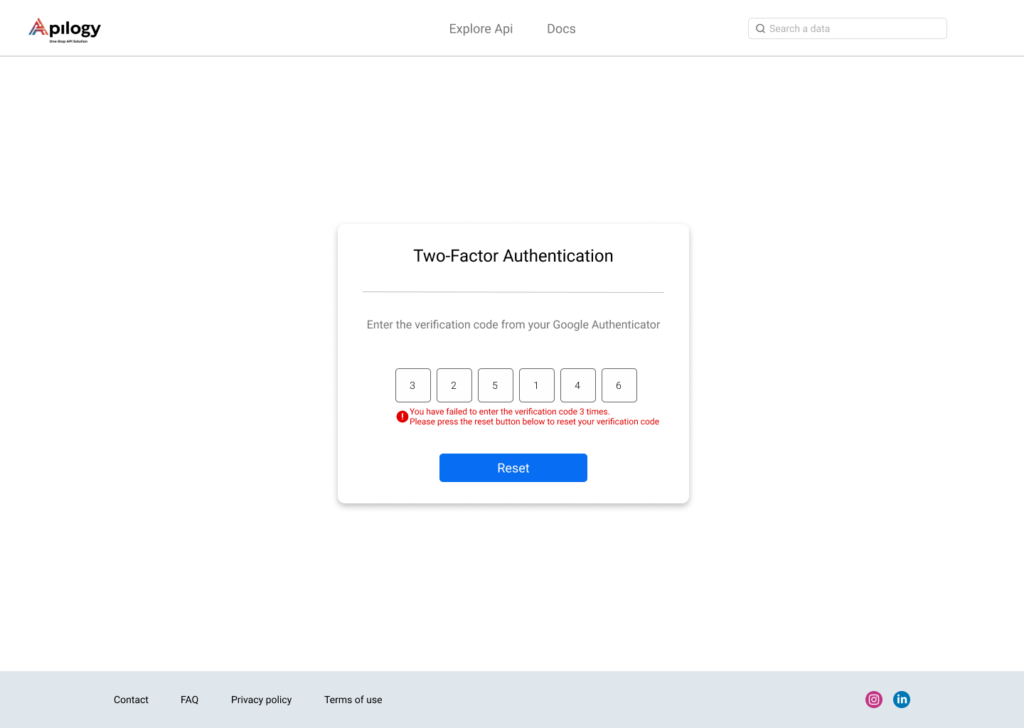
Click the Reset button to reset your 2FA settings and Apilogy will send an email to generate a new QR code for your 2FA settings.
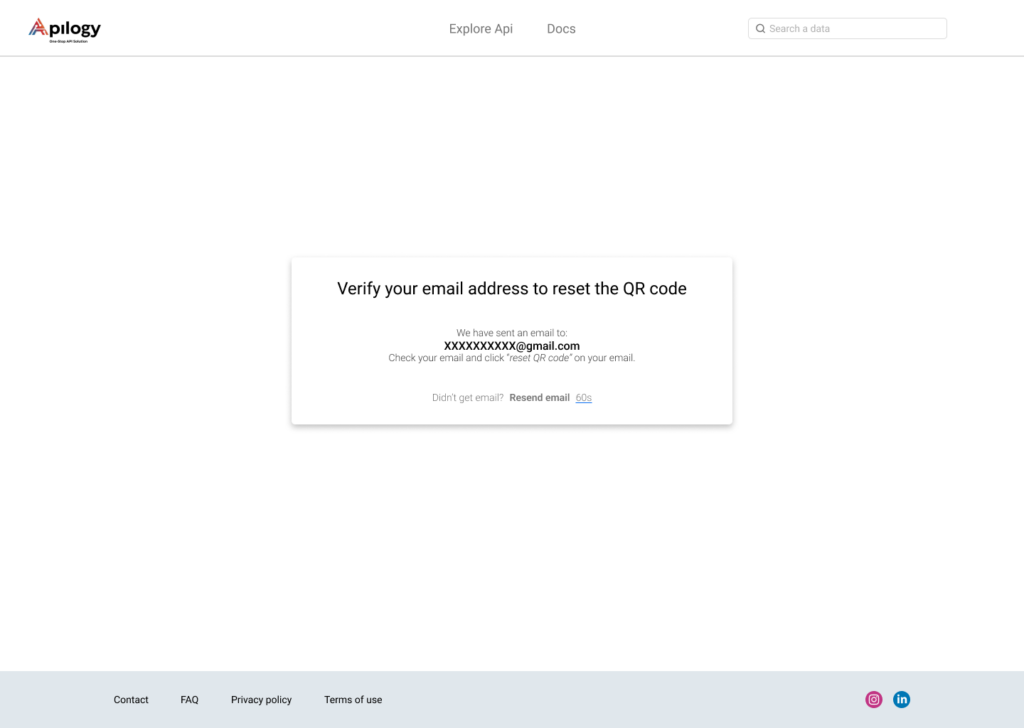
Continue the process by clicking the Reset QR Code button on the email. You will be redirected to a new page that shows your new QR code.
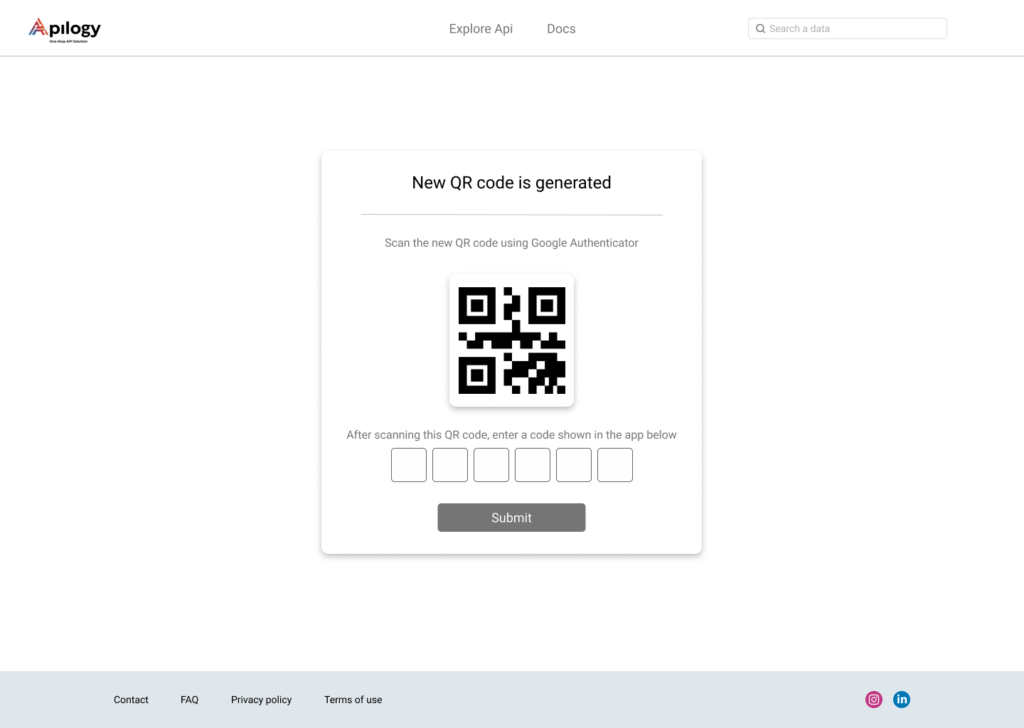
Scan the QR code with the Google Authenticator page on your phone and enter the 6-digit code. Click Submit.
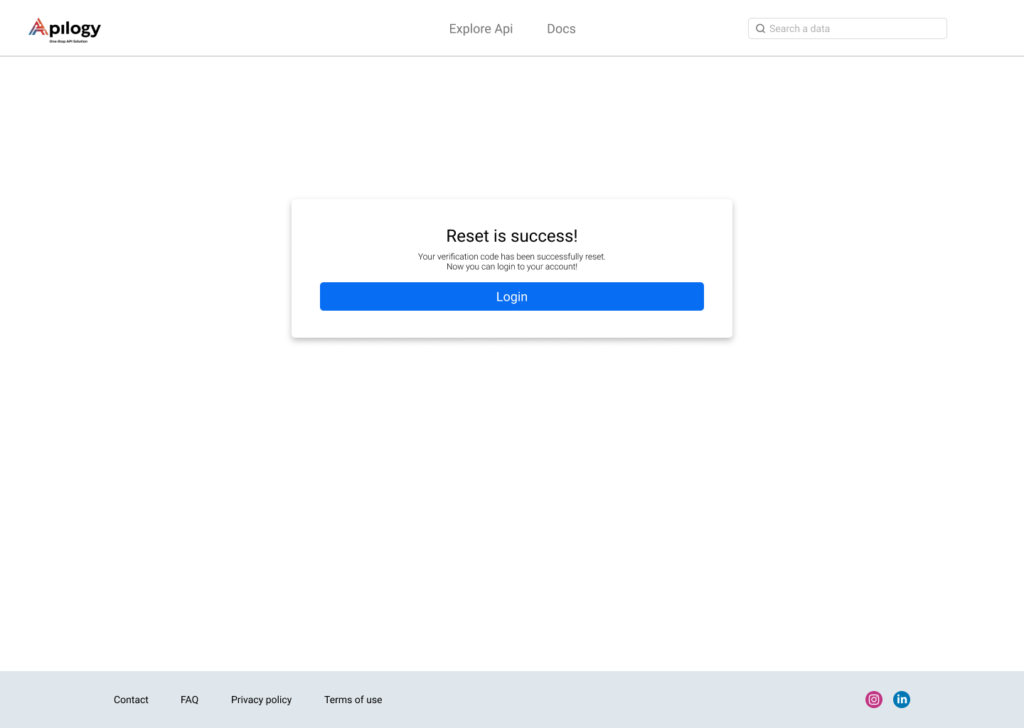
If you have successfully reset your 2FA settings, you can login to your account by clicking the Login button on the page.
Edit Profile
You can manage to add and edit your account security or information in the Manage Profile page. Click your username at the right top of the page and click Manage Profile.

Profile & Address On the Profile & Address tab, you can add your profile picture, personal information, and address.
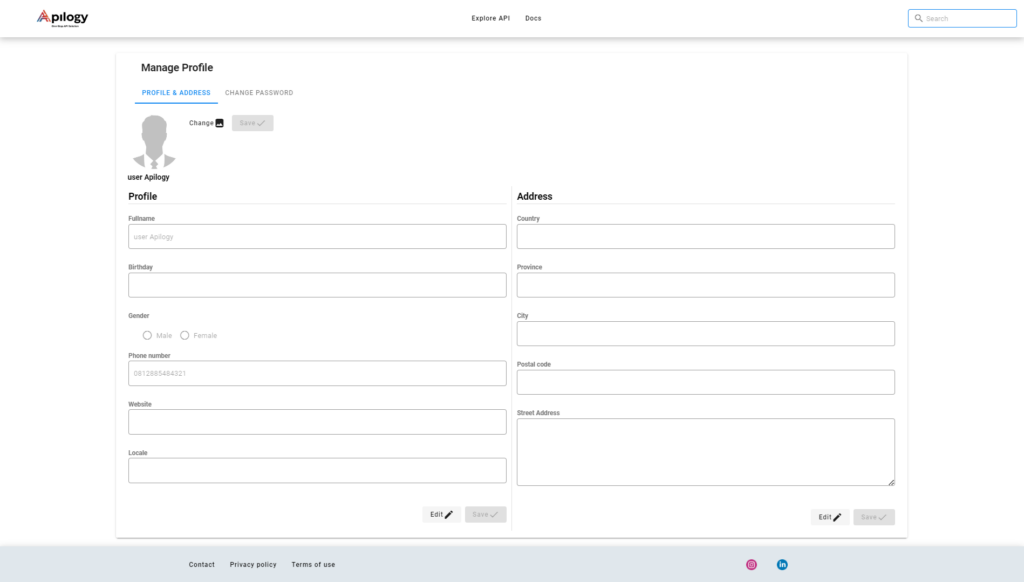
Click Change to browse the picture on your device for your Apilogy profile picture. Click Save after you have selected the photo. Click Edit on the bottom of the page to edit the information about your Profile or Address. Make sure you have clicked Save after you updated the information on each category. Change Password Go to Change Password tab if you need to change your account password.
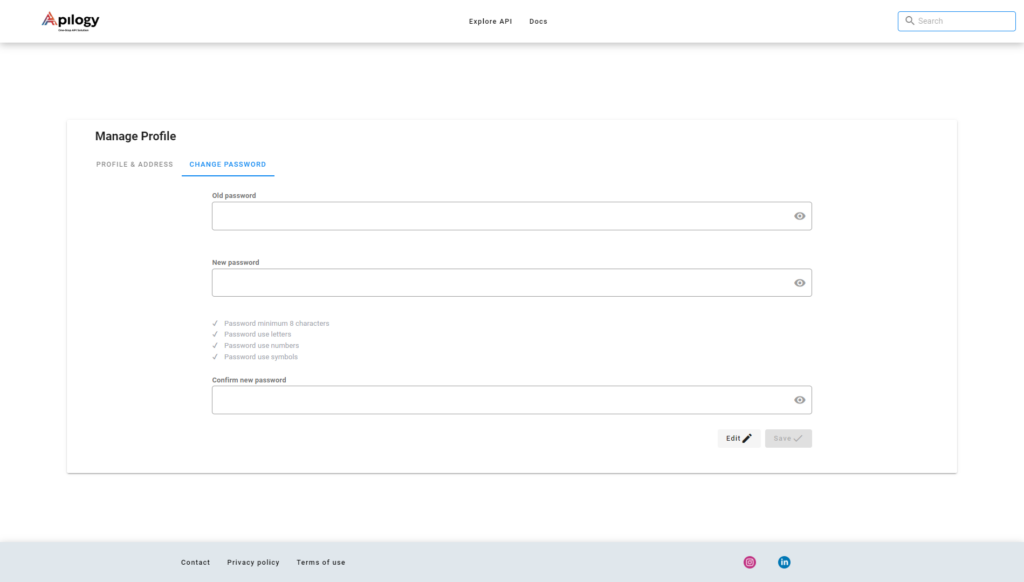
Click Edit and enter your old password. Enter your new password in the New password and Confirm new password text box. Remember that your new password must match the requirements. Once you click Save after you have created the new password, your password will be successfully changed.
EXPLORING API
Apilogy provides an API portal so that developers can explore or learn various type of API. You can explore APIs in Apilogy without having an Apilogy account. However, once you need to consuming our API, such as using a sandbox to try out API, you will need to register or login to Apilogy account.
Apilogy groups the APIs based on its category to make it easier for you to search for API that matches your needs. You can search API using a keyword to view the detail of the API as well.
Browse Category
Start exploring our API by going to the Explore APIs page.
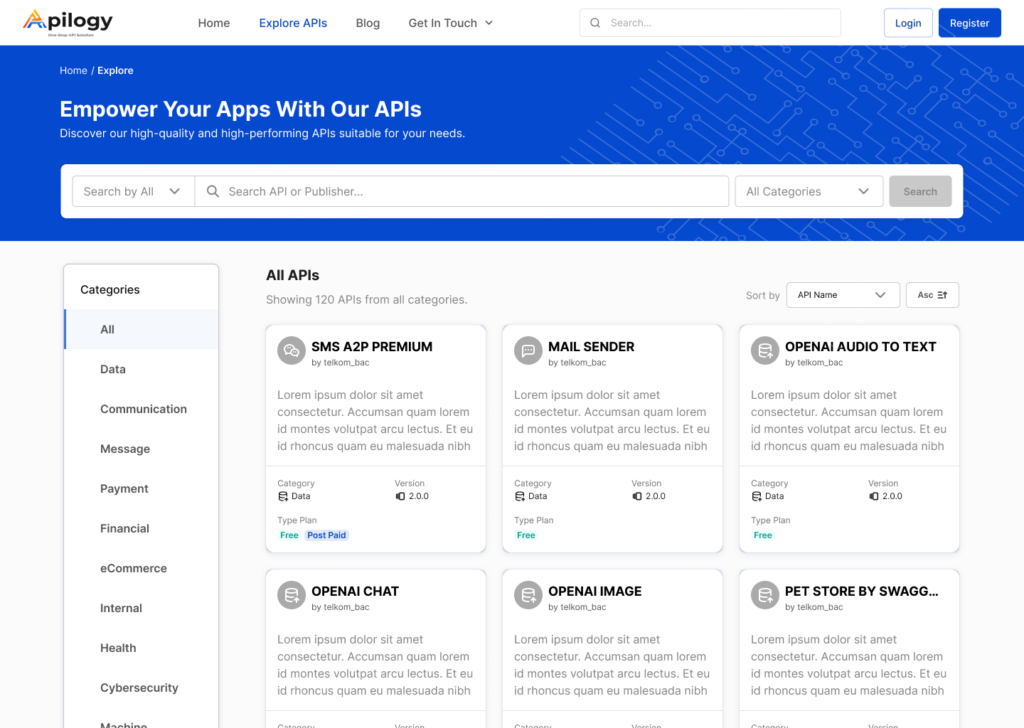
Apilogy will show all APIs without filtering them by its categories. Click one of the API category to narrow down your findings based on your needs.
Search API
To search for specific API, enter the keyword related to the API you’re looking for on the search bar at the top part of the Epxlore APIs page. You can also filter your findings by clicking the Search by All dropdown selection. Select Publisher if your keyword is related to the publisher’s name or select API Name if you want to search by its name.
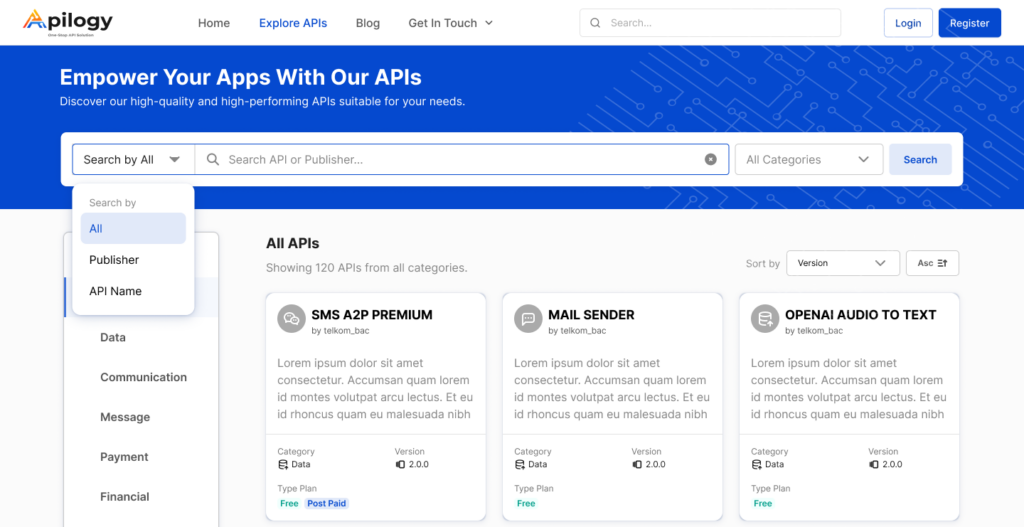
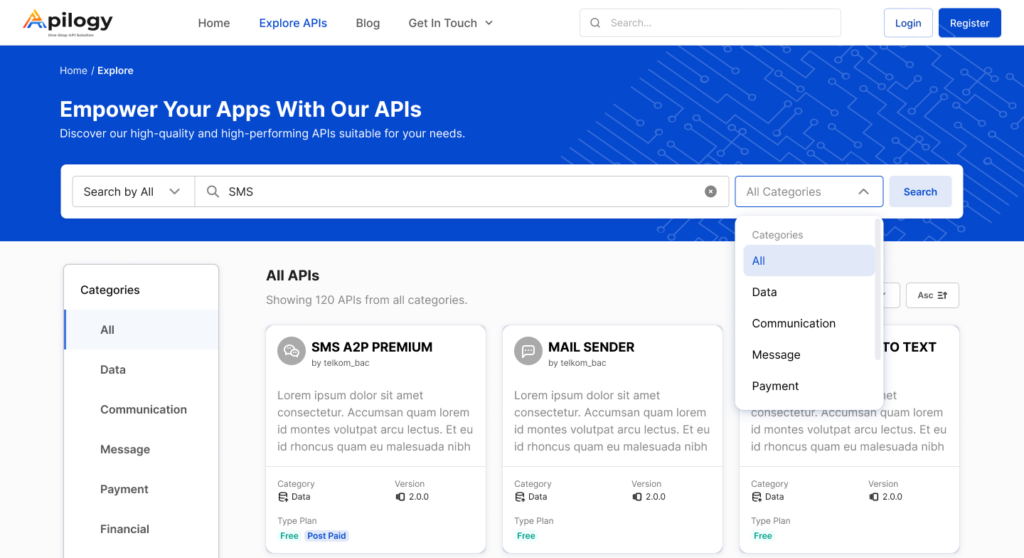
Click the All Categories dropdown selection and select one of categories if you’re looking for specific category of API. Once you’re done setting up your search necessities, click Search.
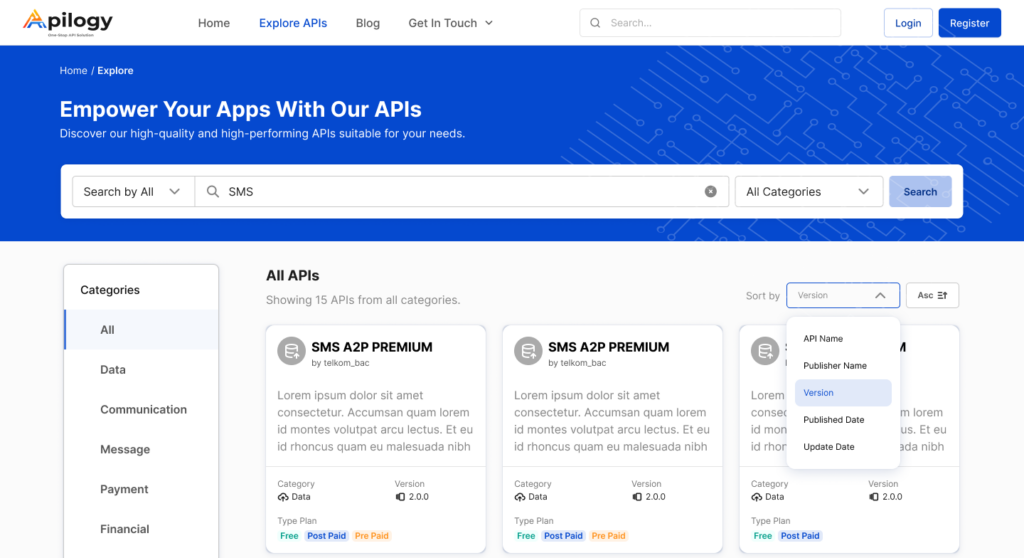
All APIs related to your search will be displayed in the Explore APIs page. To sort your findings, click the Sort by dropdown selection and you can select to sort them by API Name, Publisher Name, Version, Published Date, or Updated Date.
View API Detail
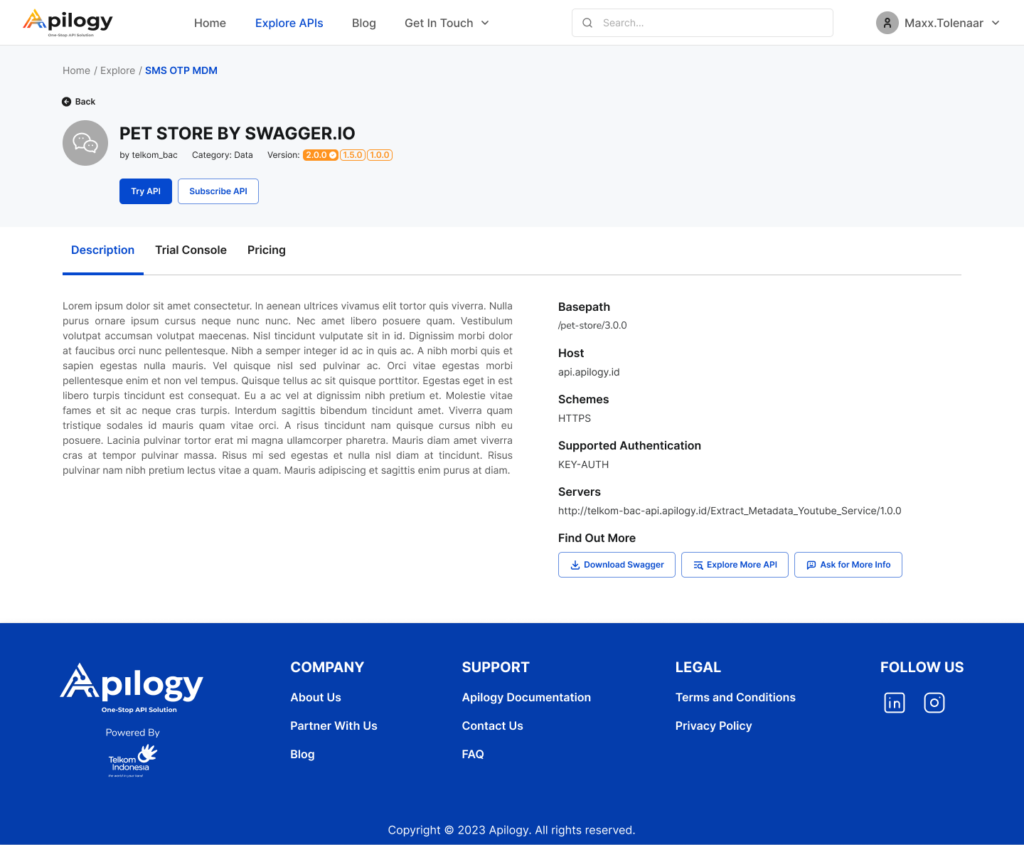
When you click one of the API in the Explore APIs page, you will be directed to its API Detail page.
In this page, there will be information about the API’s publisher name, category, and version. You can click each API version to learn more about the version details.
Description
A brief information about the API is shown in the Description tab, as well as information about Basepath, Host, Schemes, Supported Authentication, and Server. To learn about the API structure, click the Download Swagger button or you can contact the publisher by clicking Ask for More Info.
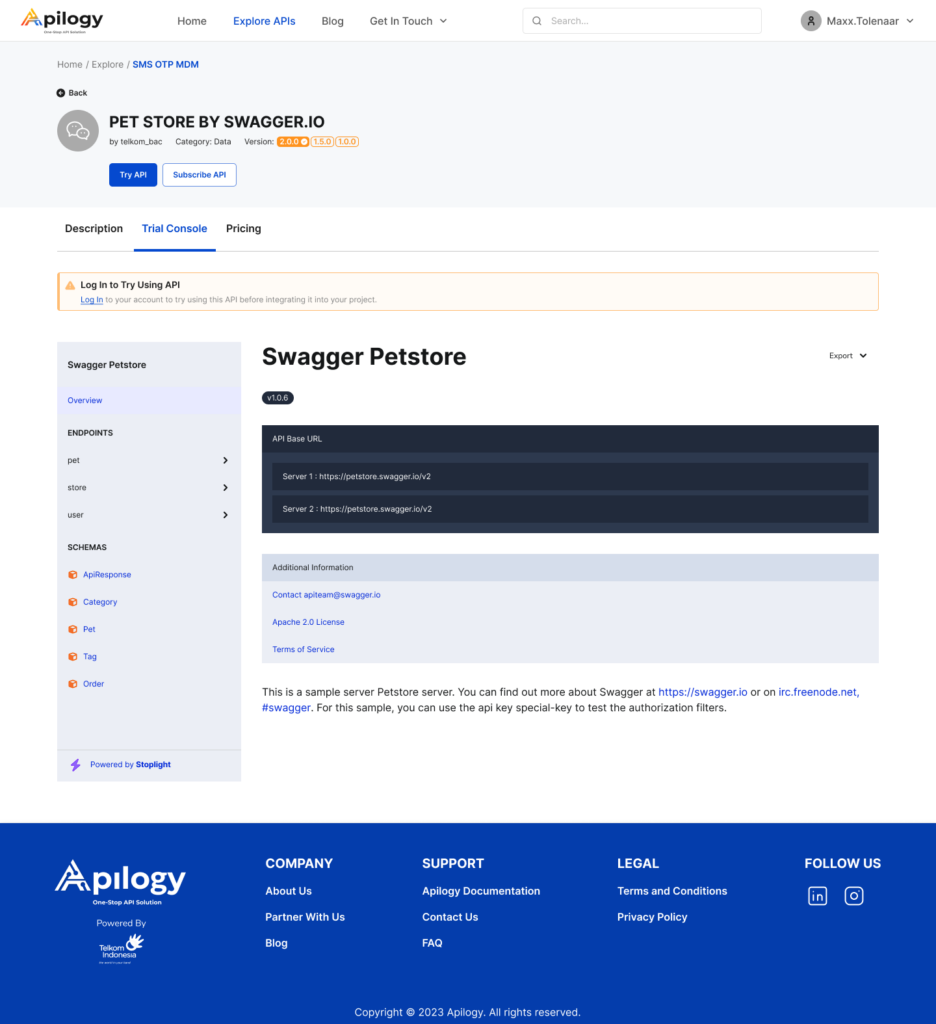
Trial Console
If you want to try out the API before implementing them into your application, click the Try API button or go to the Trial Console tab. You can try out the API if you have subscribe to the API using your account.
Pricing
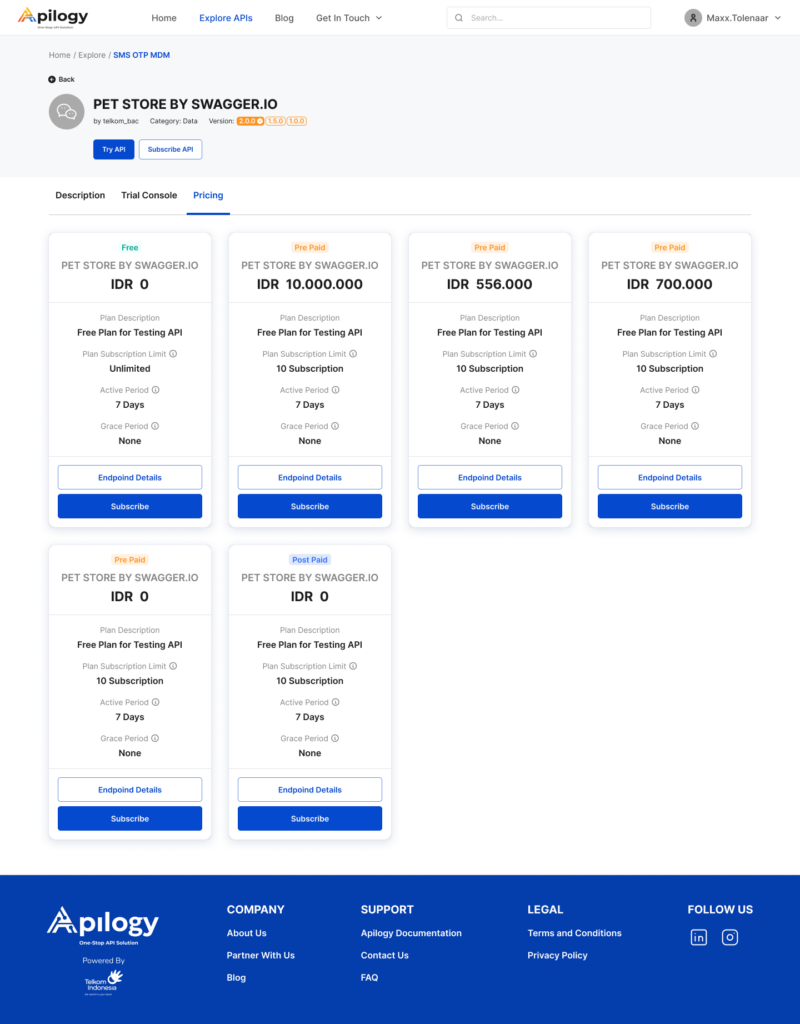
Apilogy offers multiple pricing plan for developers to subscribe to each API, which are free plan, pre paid plan, and post paid plan. Each pricing plan are distinguished based on API throttling method, which means that each pricing plan has different API calls limit. Click the Subscribe API button or go to the Pricing page if you want to view the pricing detail.
Learn how to start Subscribing API.
Try Out API
Before integrating the API with your application, you may try out the API without the need to finish developing your application in the Trial Console page.
This trial feature requires you to log in into your Apilogy account and you must subscribe to the API as well before you can try it out on your application.
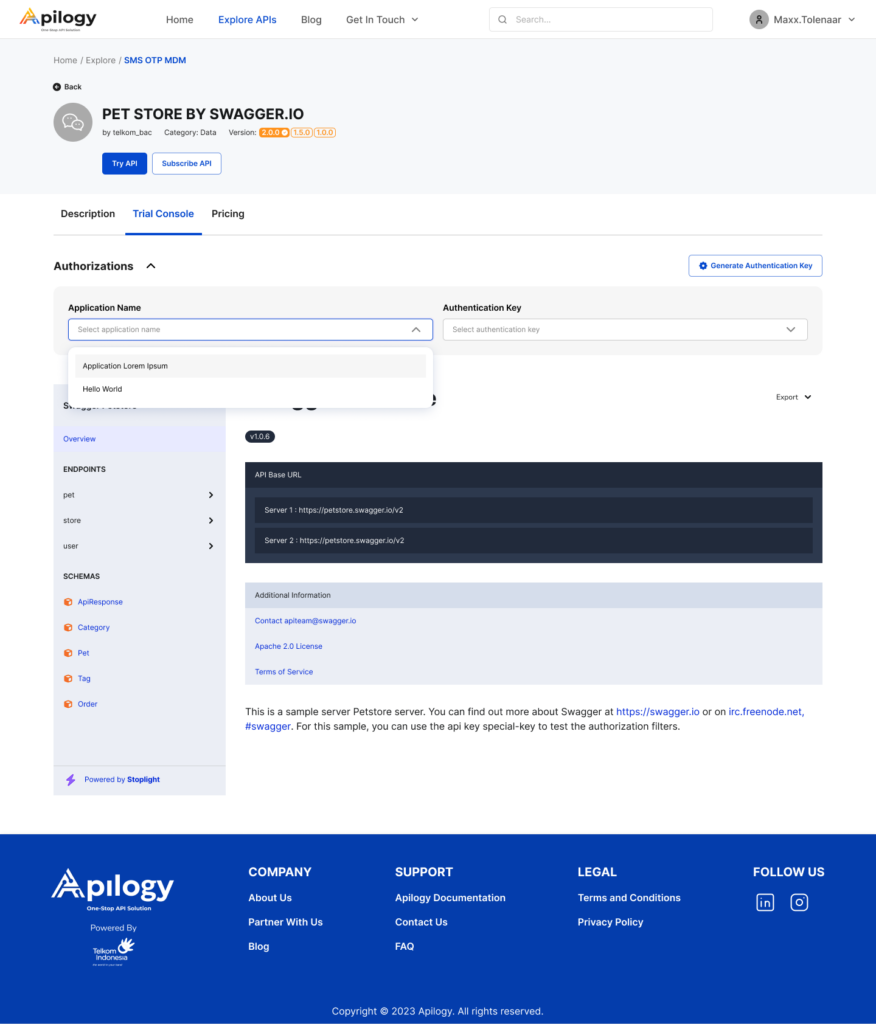
If you have subscribe to the API, you can Connect and Authorize API to start integrating them with your application.
MY ACCOUNT
You can manage and monitor all your APIs activity through our dashboard on the My Account page. Click your username at the right top of the page, then click My Account.

Create Application
Application in Apilogy is not refering to a software, but rather means a categorization in API usage. You can group multiple APIs into an application. Each application has its own API security domain and a unique key-secret pairing. On the Application menu, you will have one application called “Hello World” provided by Apilogy by default that you can use to try out your API. Create your own application by clicking New Application.
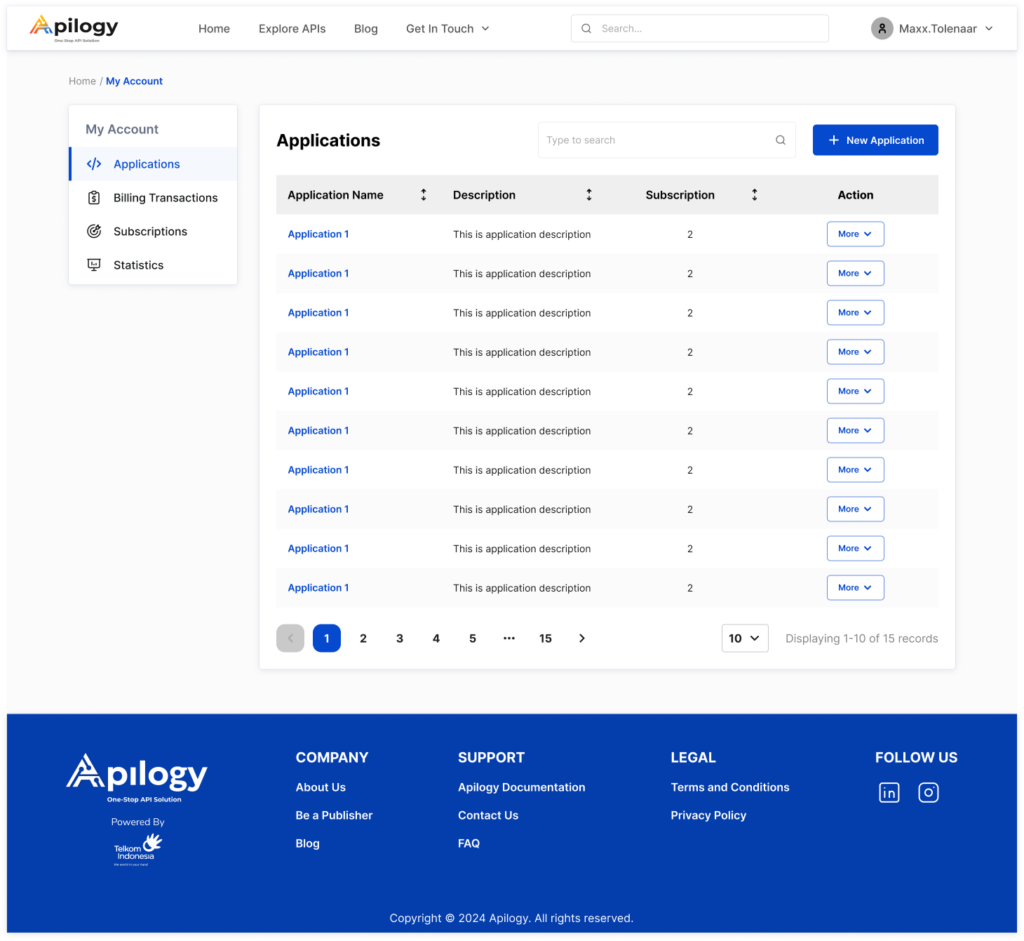
Fill out the information about the Application Name and the Description about the application. Please note that you can’t have two application with the same name.
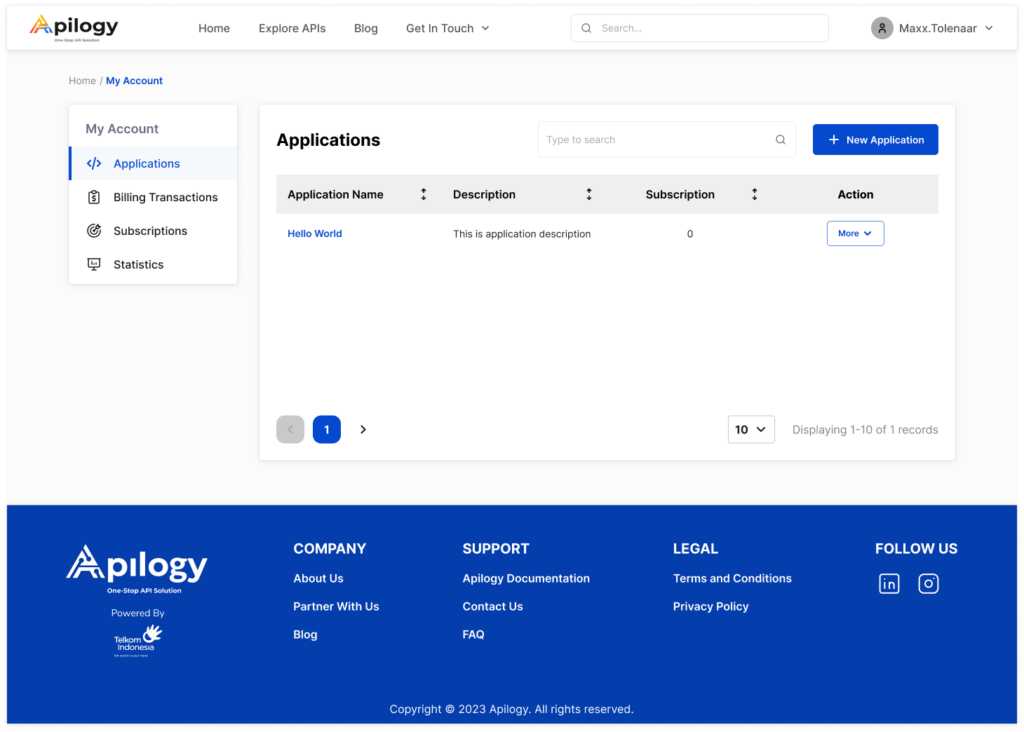
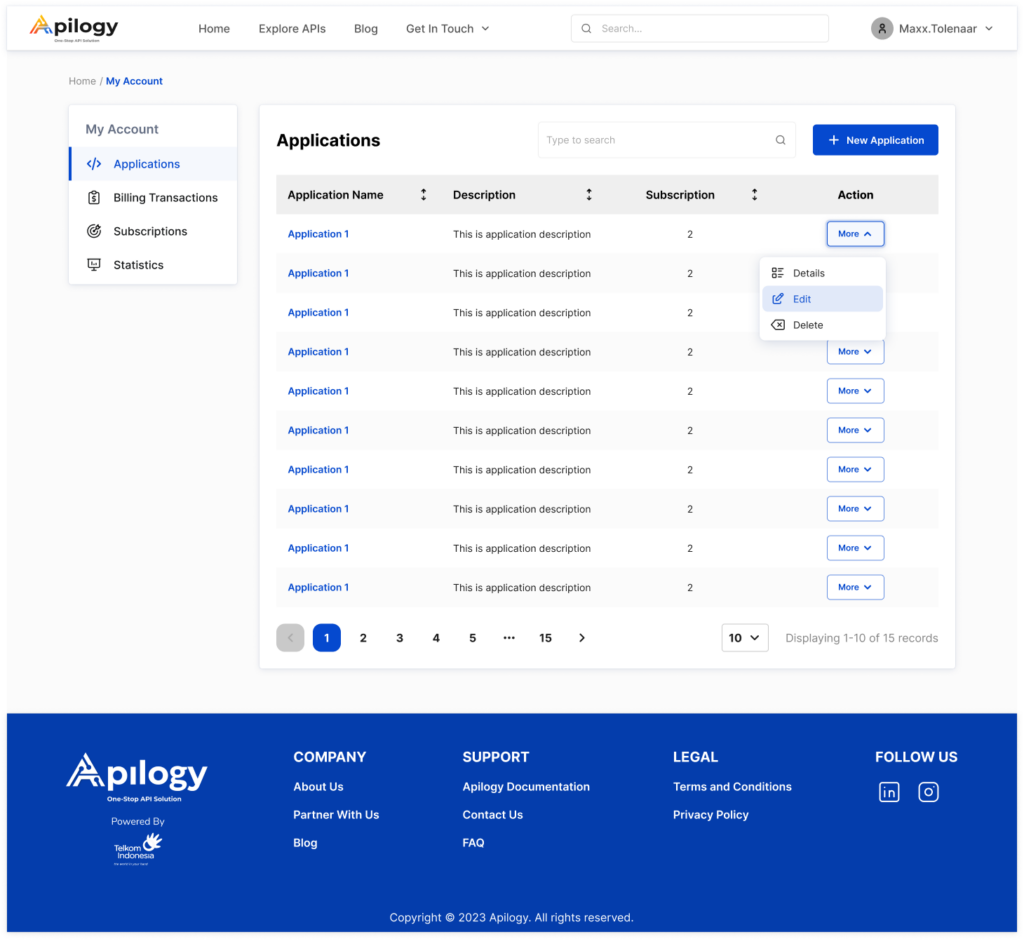
Click Create New to save the application. You cal also edit or delete the existing application by clicking More and choose the action you want to do with the application. However, you can’t delete an application with an active or pending subscription. You will need to cancel the subscription on the desired application before you can proceed to delete it.
Generate Authentication Key
Authentication Key are unique identifiers that authenticate and grant acess to integrate your platform with API in Apilogy. It is act as an security layer and bridge and allows your platform to communicate with the APIs. This key can be obtained when you have have created an application in Apilogy and make a request to generate authentication key. Click More on one of the application you have created to begin generating the authentication key, then click Details. You will be redirected to the Application Detail page.
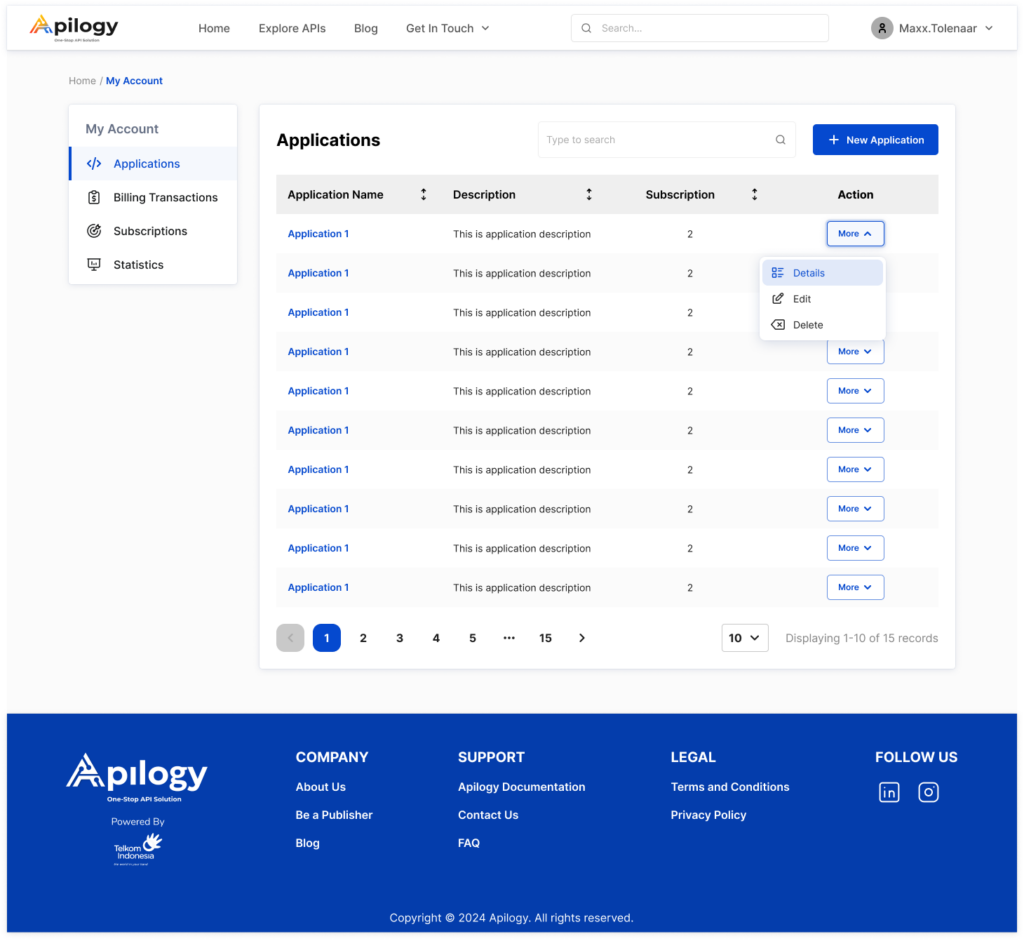
On the Authentication Key tab, select the authentication method you want to add to the application.
Basic Auth
With this method, you will need to enter your Apilogy username and create a unique password, then click Generate Key.
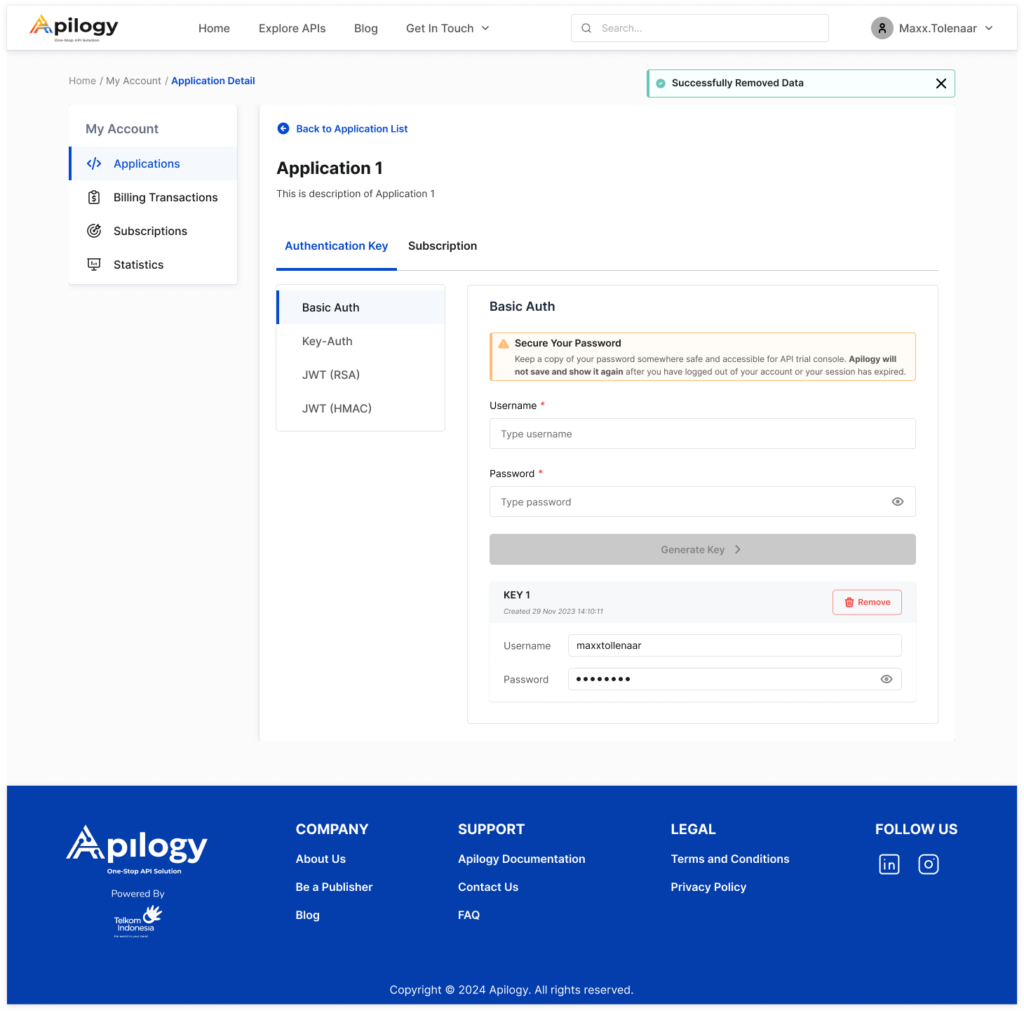
Keep the password you have created somewhere accessible and secure because Apilogy will not show and save them in our database.
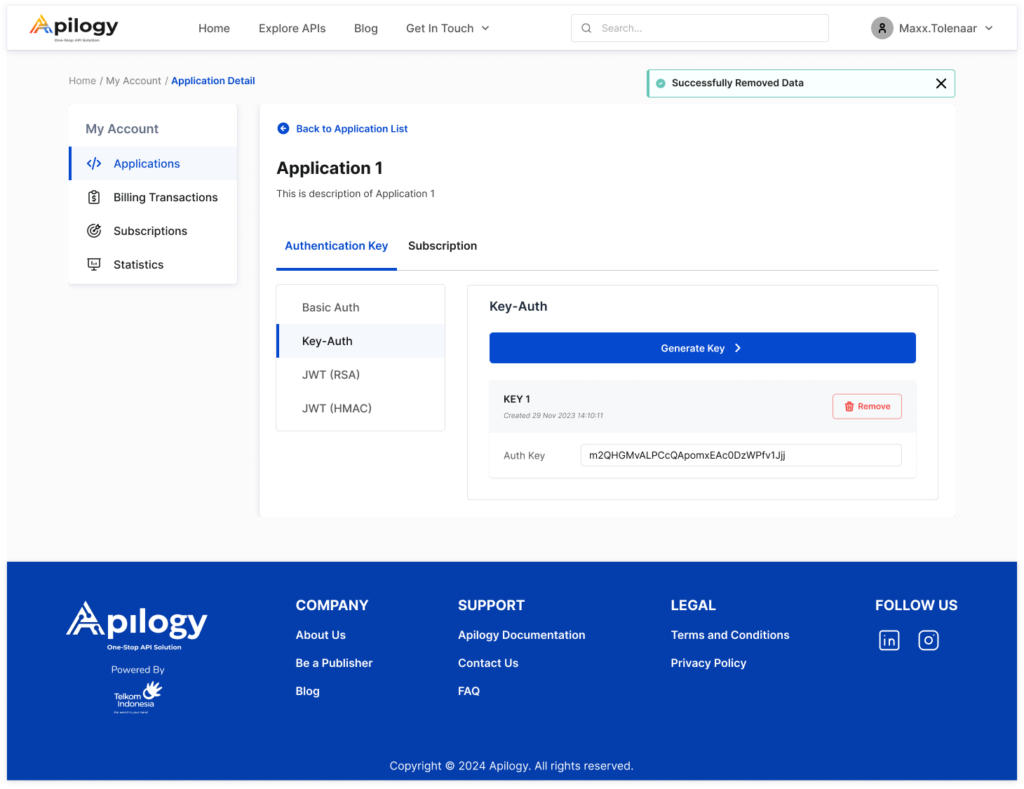
Key-Auth
This is the easiest method for you to generate your key. Click Generate Key and your Auth Key will be created and ready to use.
JWT (RSA) or JWT (HMAC)
With JWT authentication method, you will only need to click Generate Key to create the authentication key for your application.
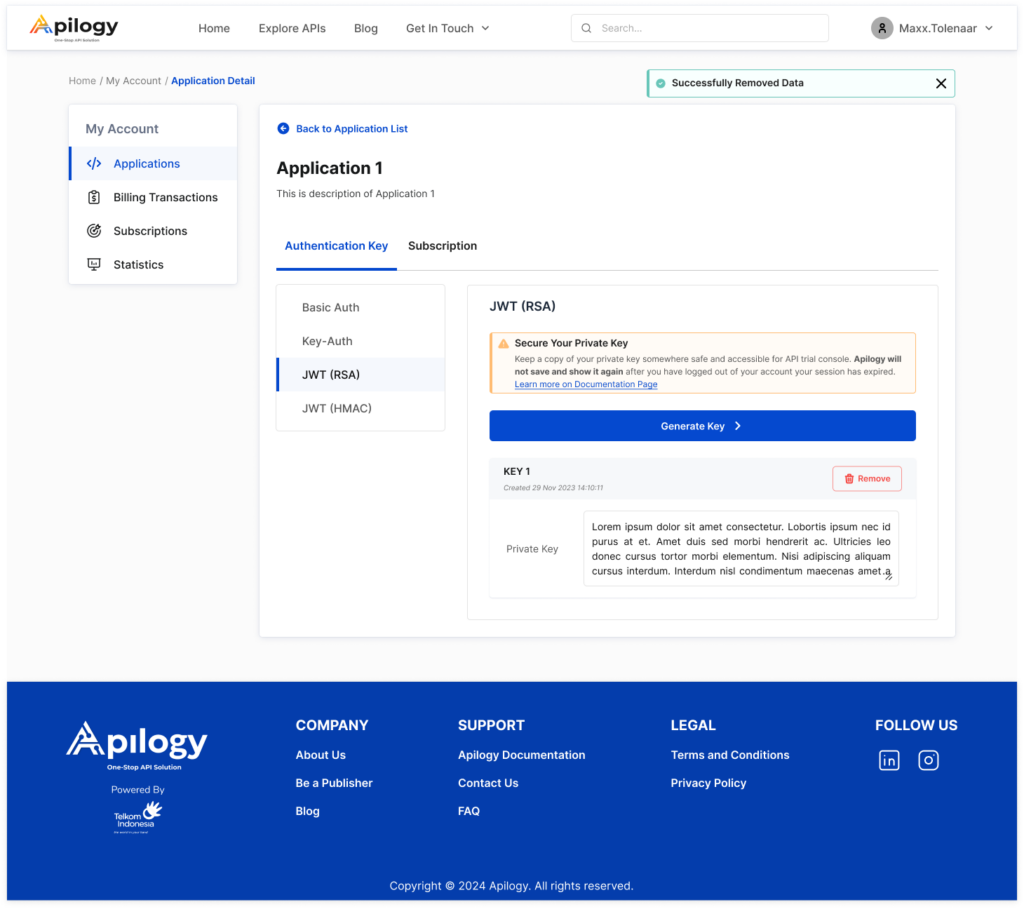
Once the key have been generated, ensure you create a copy and keep them in somewhere accessible and secure for future authorization. Apilogy will not store them in our database, thus we can’t show them again after it has been generated.
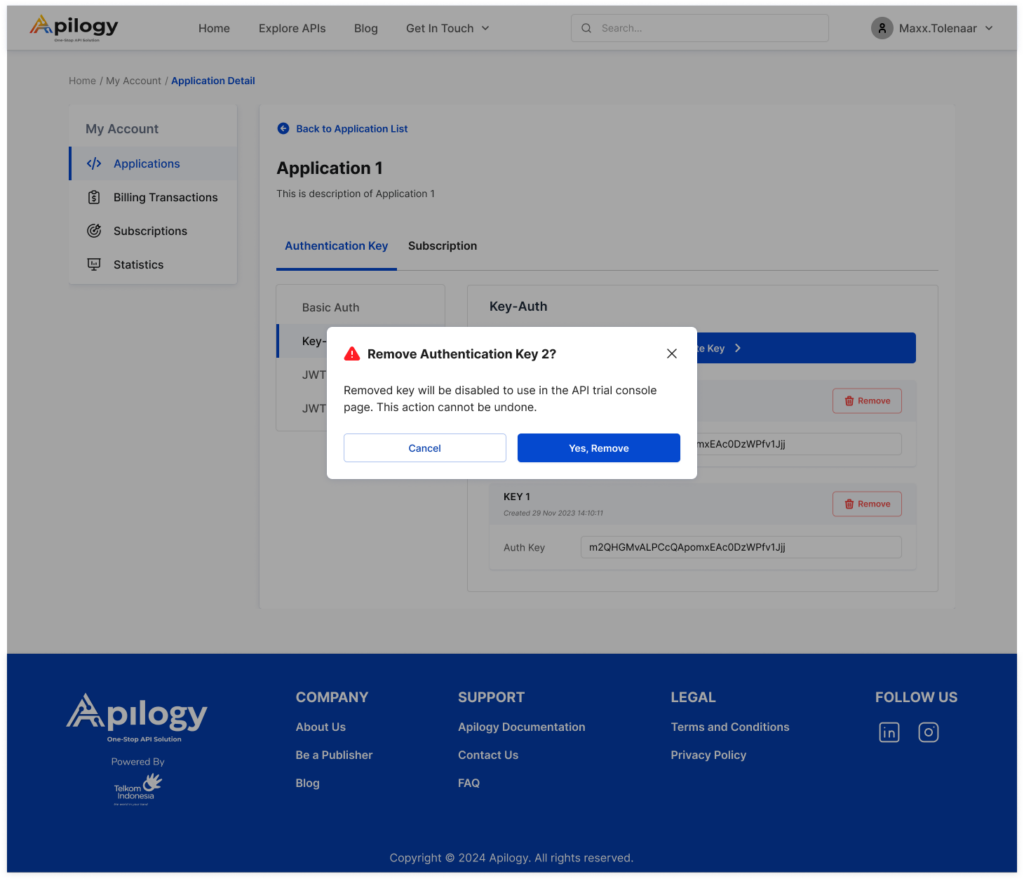
If you are unable to show the key in your future API authorization, you might generate a new key in the same page. Any key you have created can be deleted by clicking Remove. The deleted key will be unavailable to be used in the Trial Console on your subscribed API.
Manage Billing Transaction
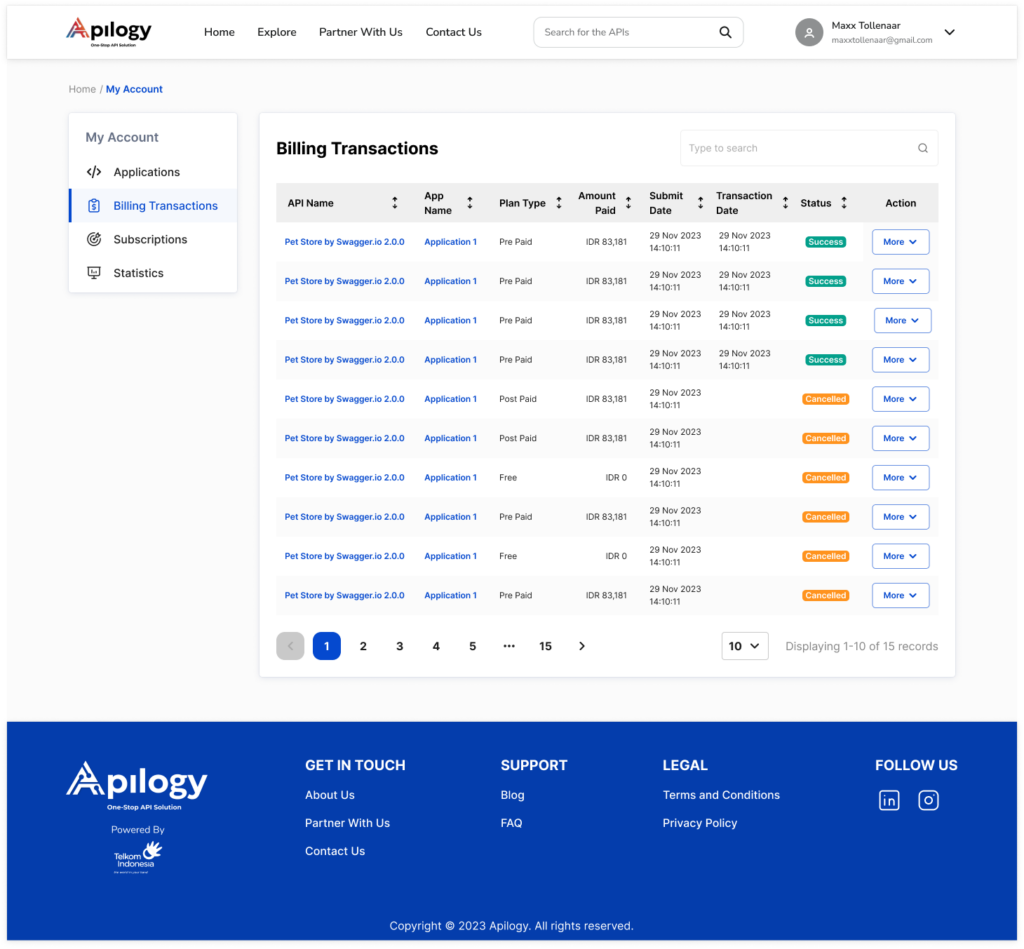
In Billing Transaction, you can monitor and manage all your API order along with its payment status. The status of your transaction is categorized into 3 (three) status, which are:
-
- Success: When you have paid your API subscription;
-
- Pending: When you have created your order, but haven’t done your payment; and
-
- Cancelled: When you don’t pay the payment during the given time or you decide to cancel your order.
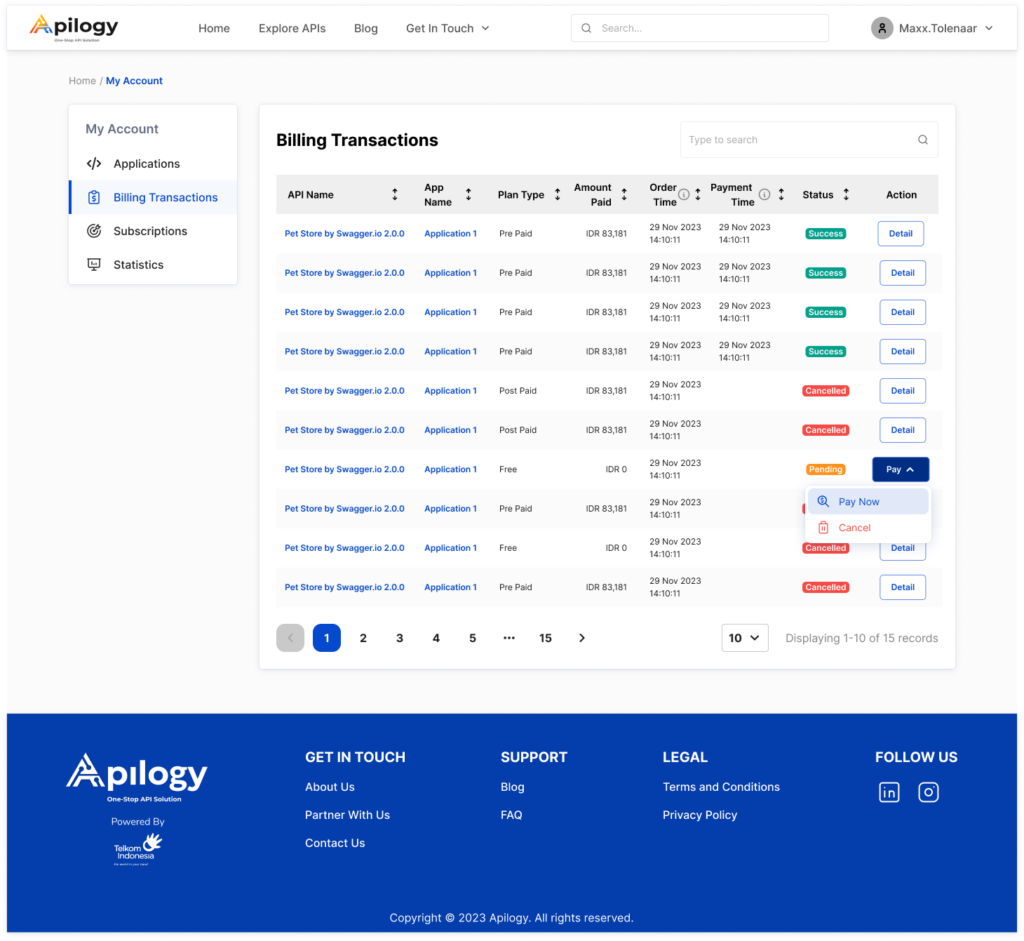
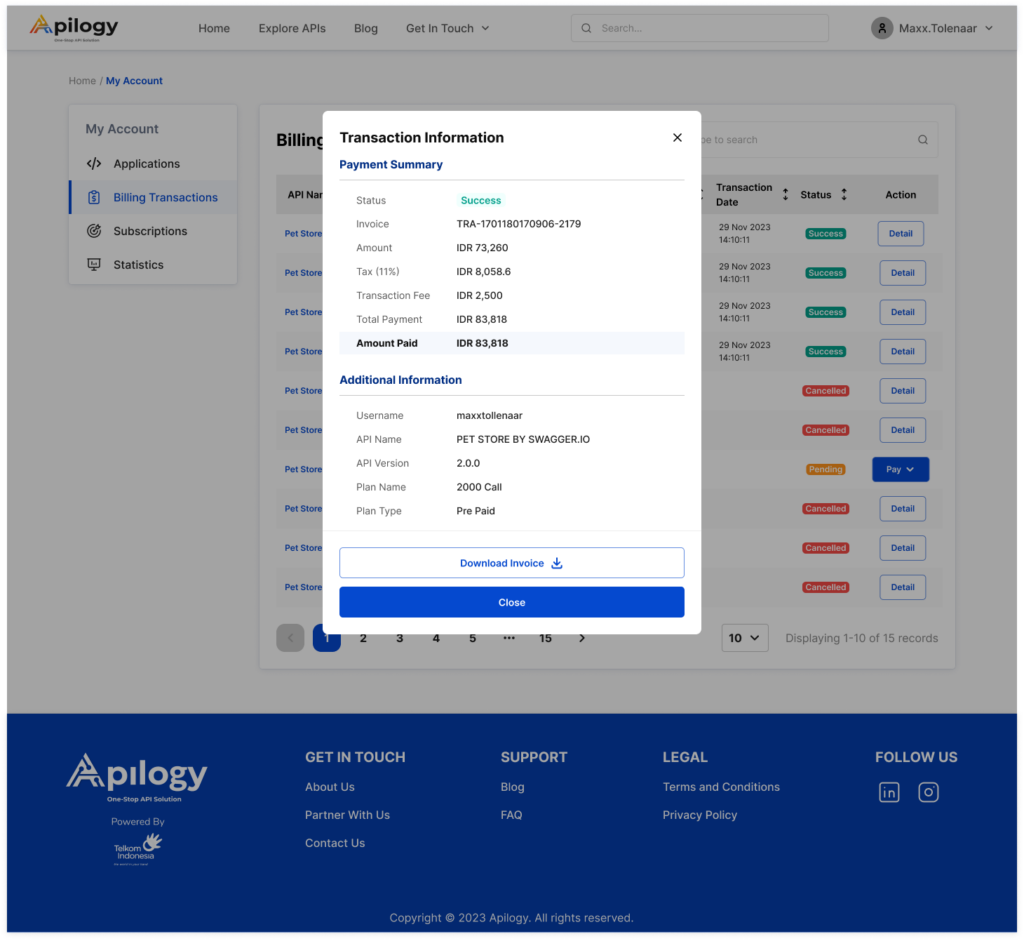
If you click Detail on the transaction with pending status, you can decided whether you want to pay and proceed with your API subscription by clicking Pay Now or cancel the order by clicking Cancel. If you decide to proceed with the subscription, you will be redirected to the Checkout page to finish your payment. On the other hand, by clicking Detail on transaction with success or cancelled status, you can view the Transaction Information. You can also download the invoice of the success transaction.
Manage Subscriptions
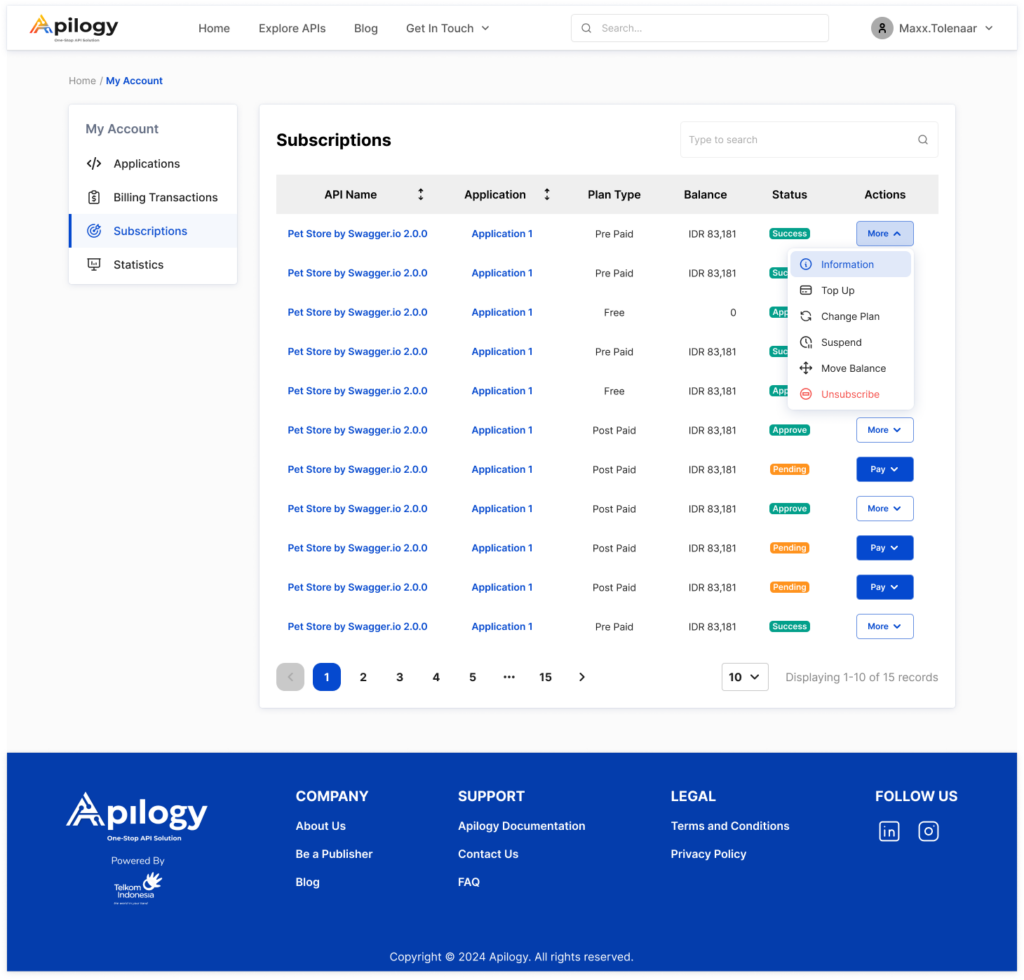
Manage all your APIs subscription in the Subscription menu in My Account page. There will be 2 (two) type of status for API in the Subscription page, which are Pending and Approve. APIs with pending status are the API you have ordered but haven’t finish its payment. You can finish the payment process in the Billing Transaction page or cancel it by clicking Cancel. The canceled API will be recorded in the Billing Transaction page as well. Meanwhile, API with approve status are the subscribed API you are using on your application. You can manage the API subscription by clicking More.
Information
Click Information to view the subcription details of the API.
Suspend
This can be used when you want to disable your API usage temporarily. You can continue to activate the API usage by clicking More on suspended API, then click Unsuspend.
Move Balance
Move Balance is used when you want to transfer your balance from one of the API subscription to another one. But, you have to suspend the subscription of the source API before you can move its balance. Once you have suspend the API, click Move Balance. Select the application and the API as the balance source in the Transfer from selection. Then, select the application and API you want to move the balance to in the Transfer to selection. Enter the amount of balance you want to transfer in the Transfer Amount or click the Transfer all amount checkbox if you want to transfer all balance of the selected API.
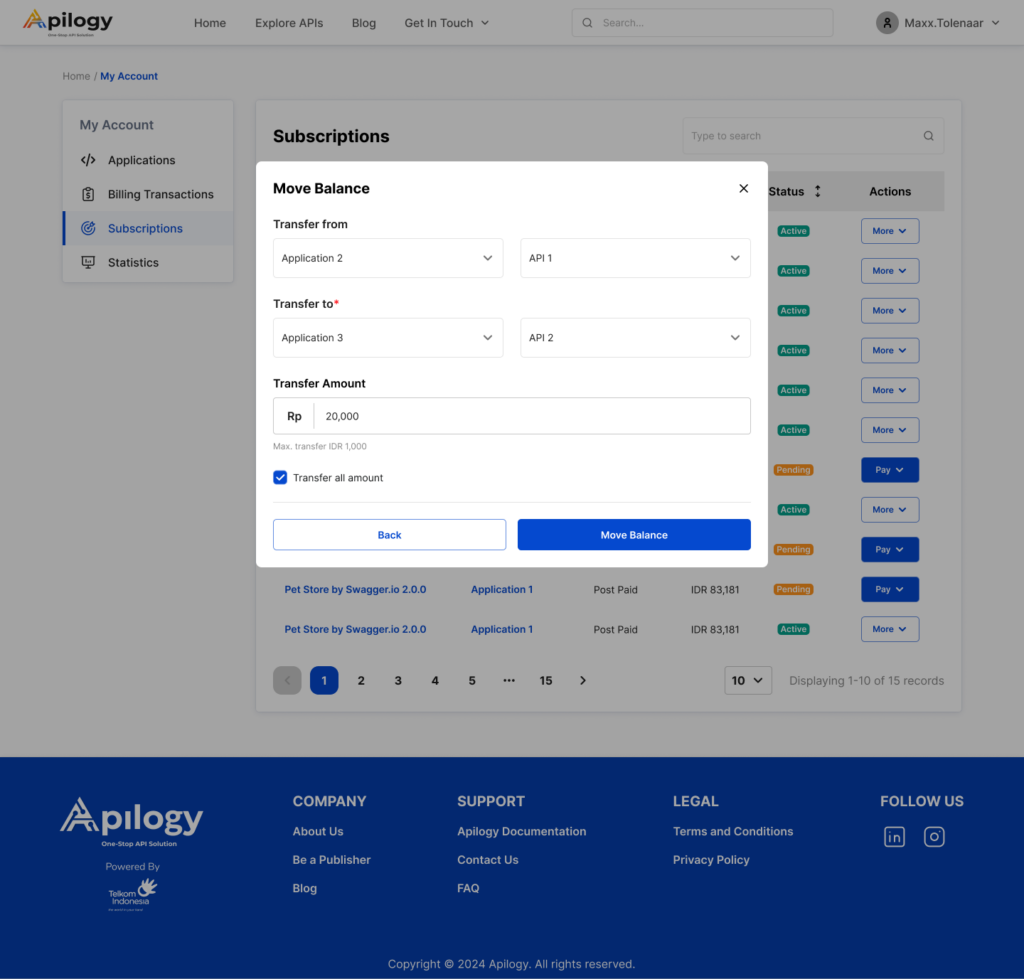
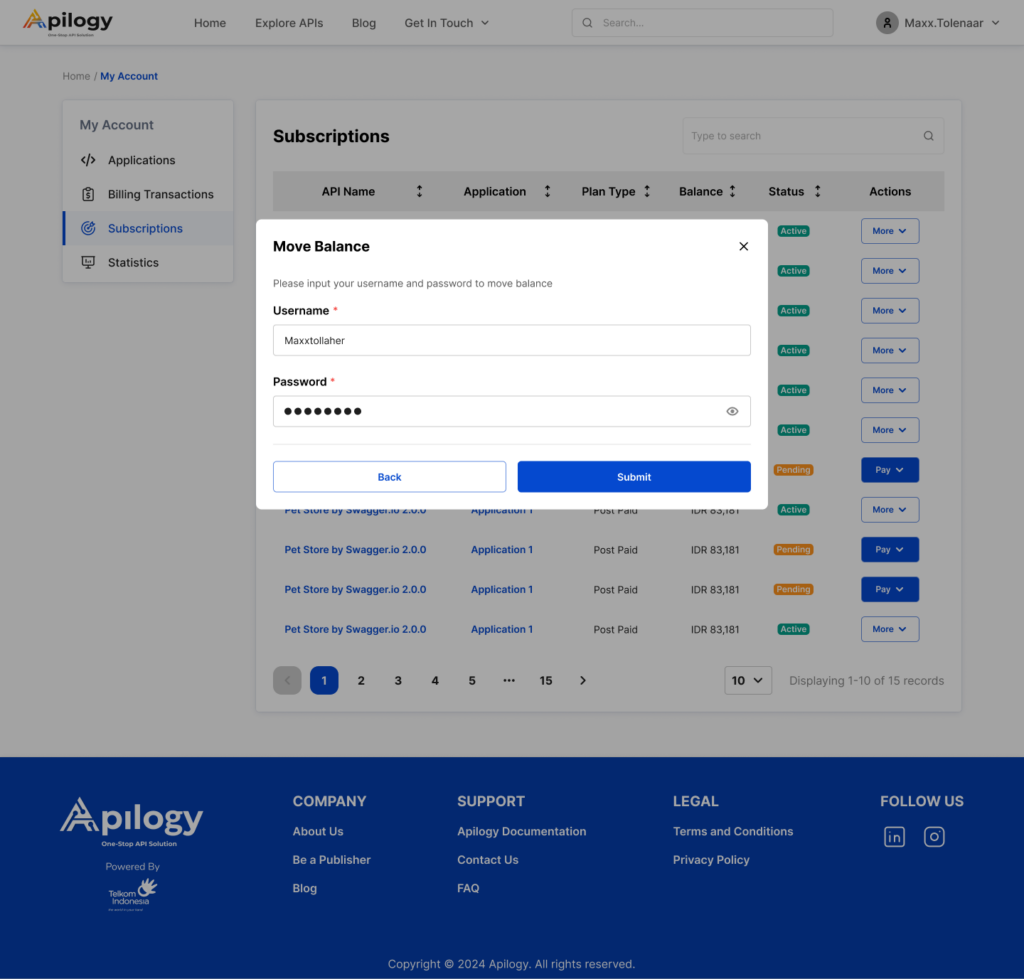
Click Move Balance to proceed with the transfer. You will need to enter your username and password to confirm you action. Click Submit after your fill out the information needed.
Unsubscribe
If you want to stop using the API in your Application, click Unsubscribe. You can proceed to unsubscribe free API plan immediately.
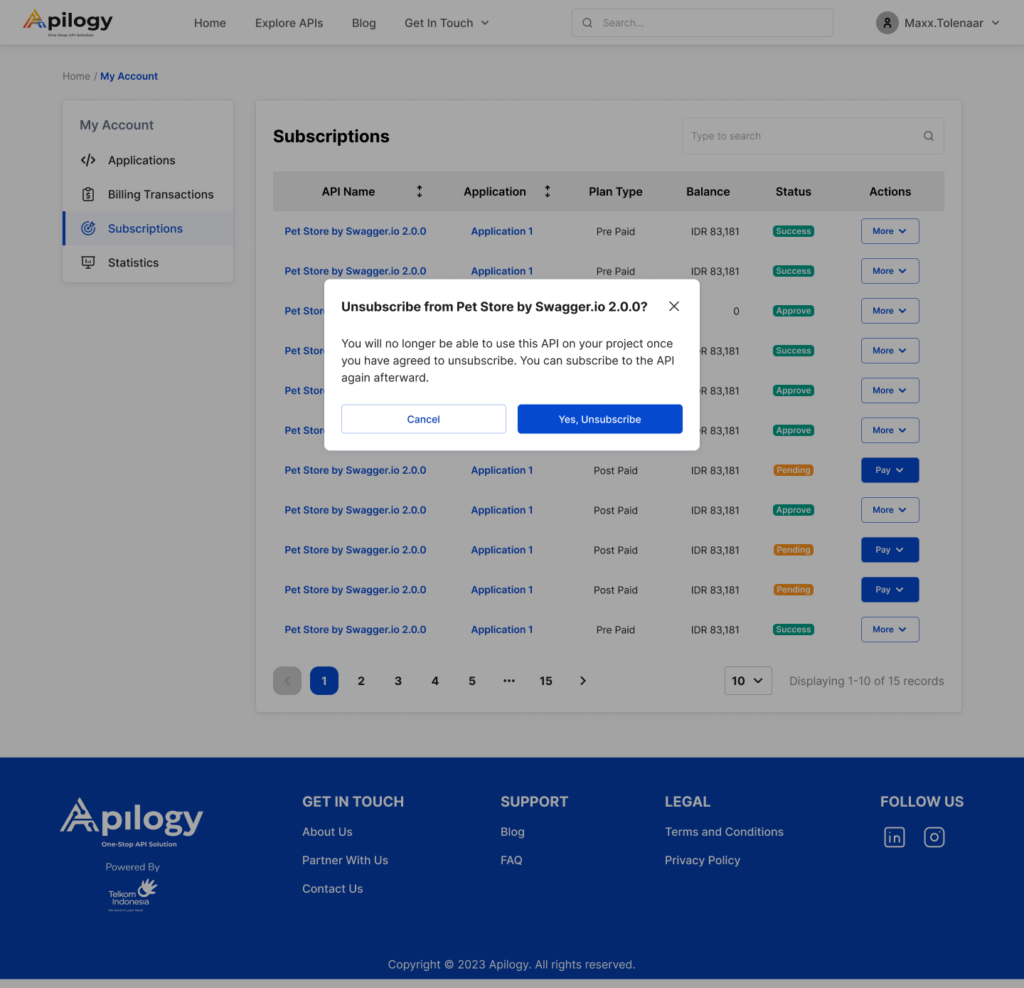
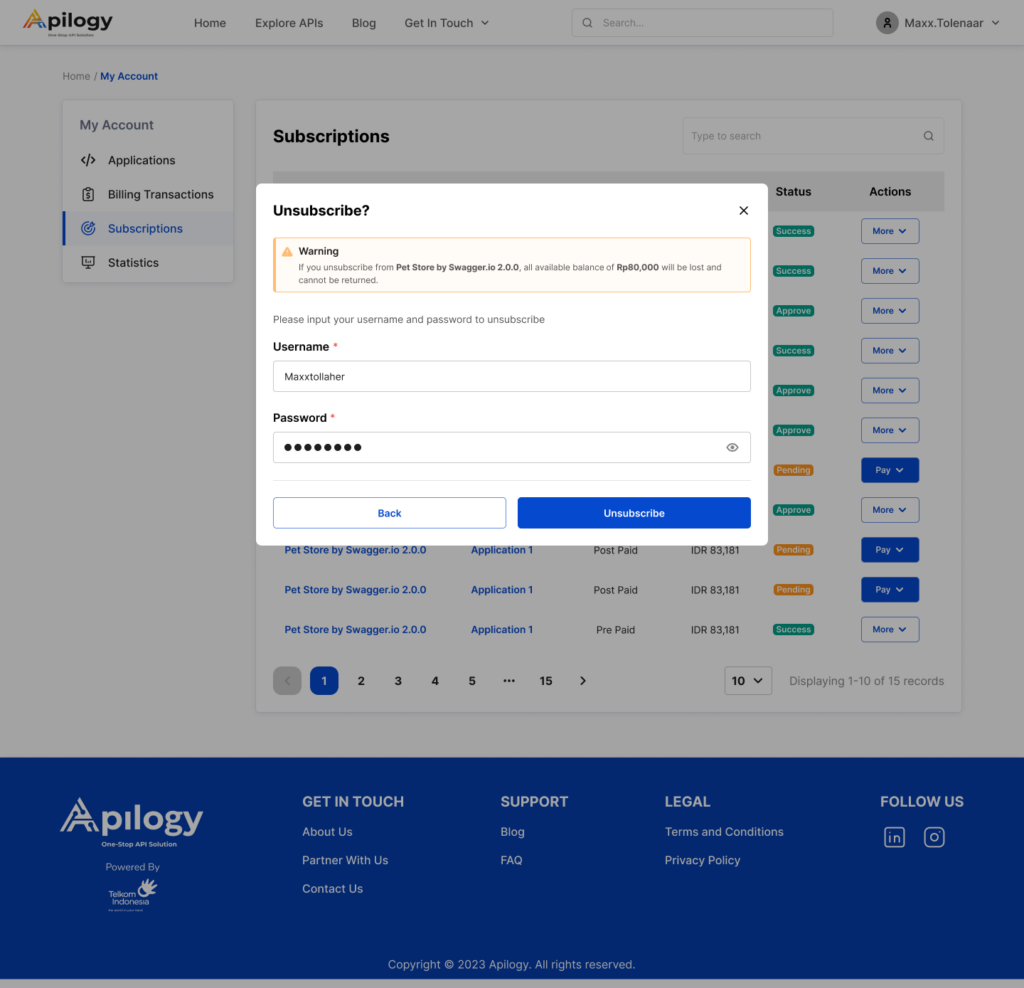
When unsubscribing from a prepaid plan, your remaining balance on the API plan will be lost and can’t be refunded. You will also need to confirm your unsubscription by entering your username and password. Then, click Unsubscribe to proceed with the action.
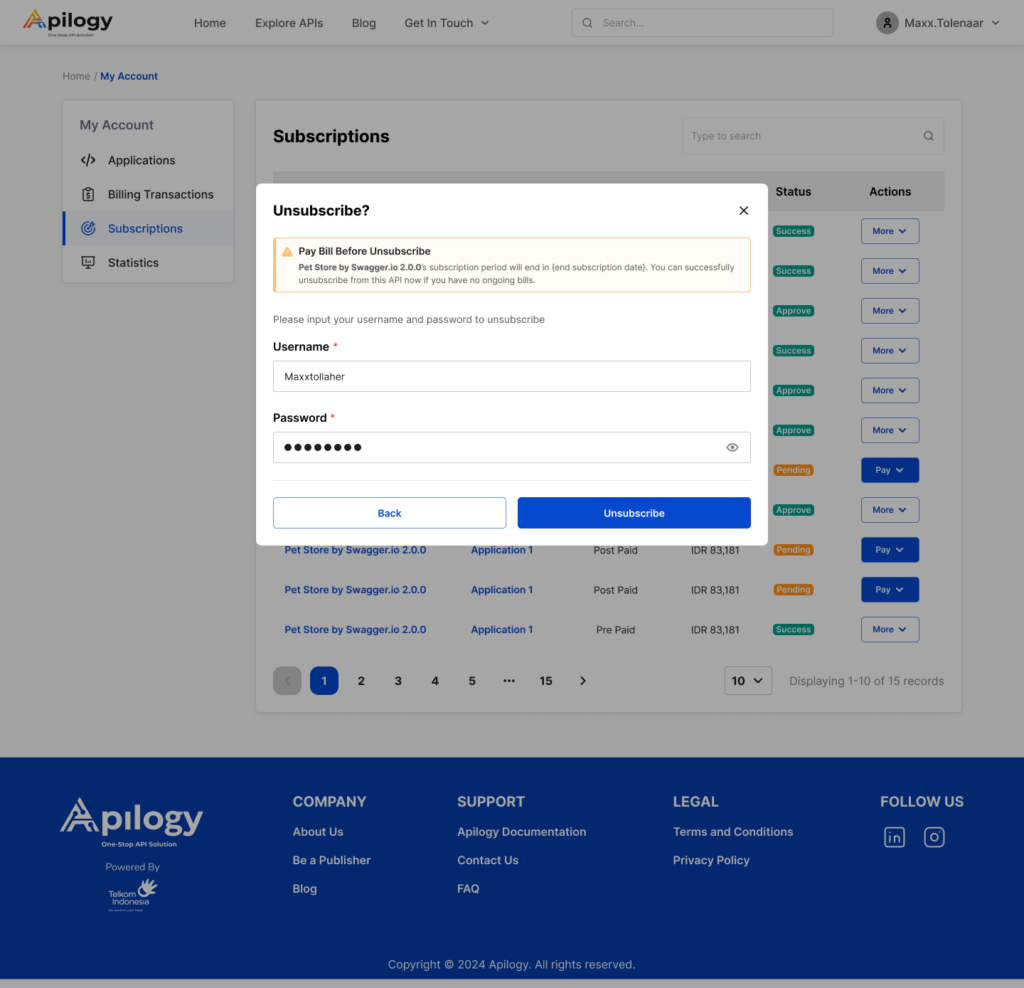
Lastly, to unsubscribe from a post paid plan, you will need to pay the usage bill for the selected API beforehand. After you have paid the bills, you will need to confirm your unsubscription by entering your username and password. Then click Unsubscribe to proceed with it.
Meanwhile, Top Up and Change Plan is used to modify your ongoing prepaid subscription. To learn more about how to modify your subscription, refer to the table of contents at the top of this page.
Monitor API Usage
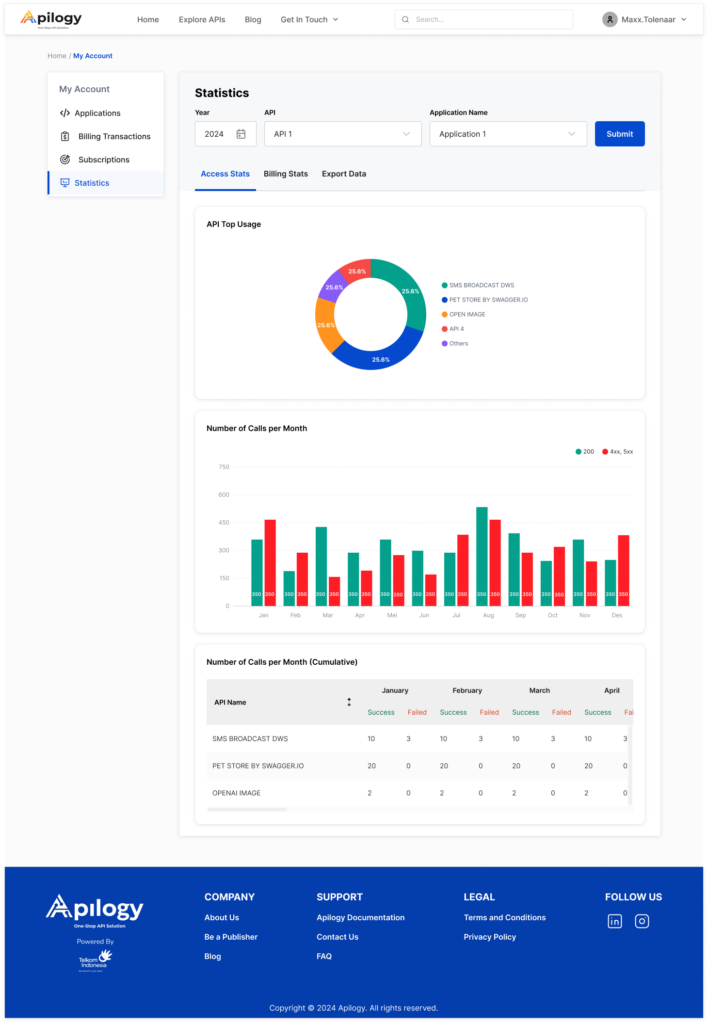
Learn how to manage your API usage by monitoring your activity report on the Statistics menu on My Account page. The data in the Statistics menu will only be available if you have subscribed and used API in Apilogy. At the top of the page, filter the API report you need by selecting the Year, API, and Application. Then, click Submit.

There are 2 (two) types of API report provided by Apilogy:
Access Stats
Access Stats shows the data of the API you have been using during the period, including the number of successful and failed API calls.
Billing Stats
Billing Stats shows the total transaction for each month within the selected period. You can see how much you have spent each month on each API, including monthly billing and your top-up details.
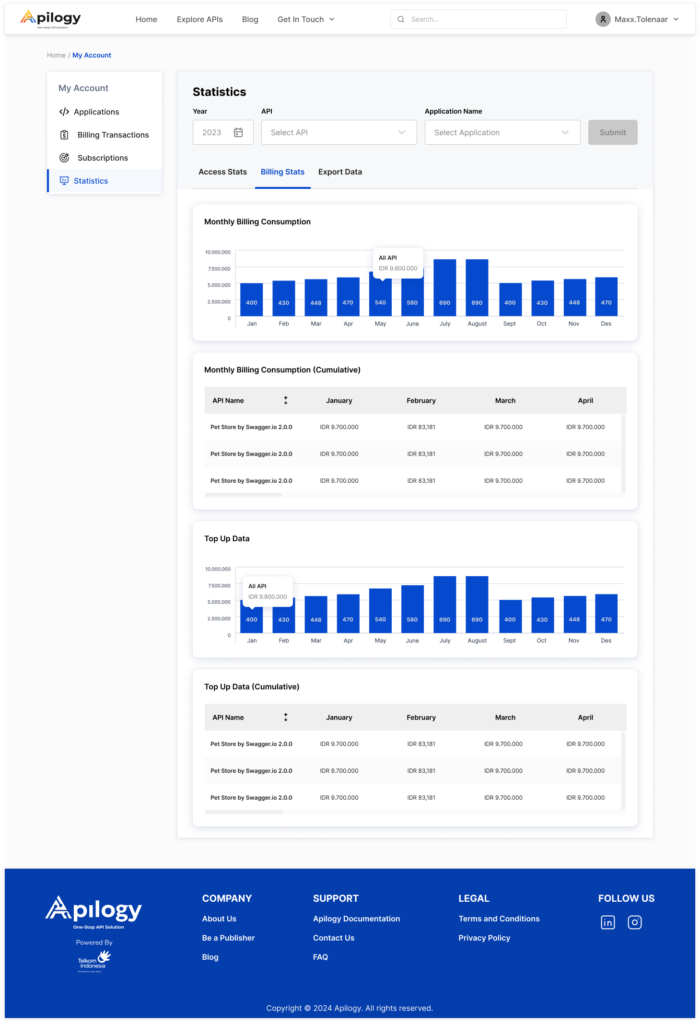
Both of those statistics data can be saved to your device by downloading them through the Export Data tab.
Export Data
First, select the period for the data you want to download using the Date picker.
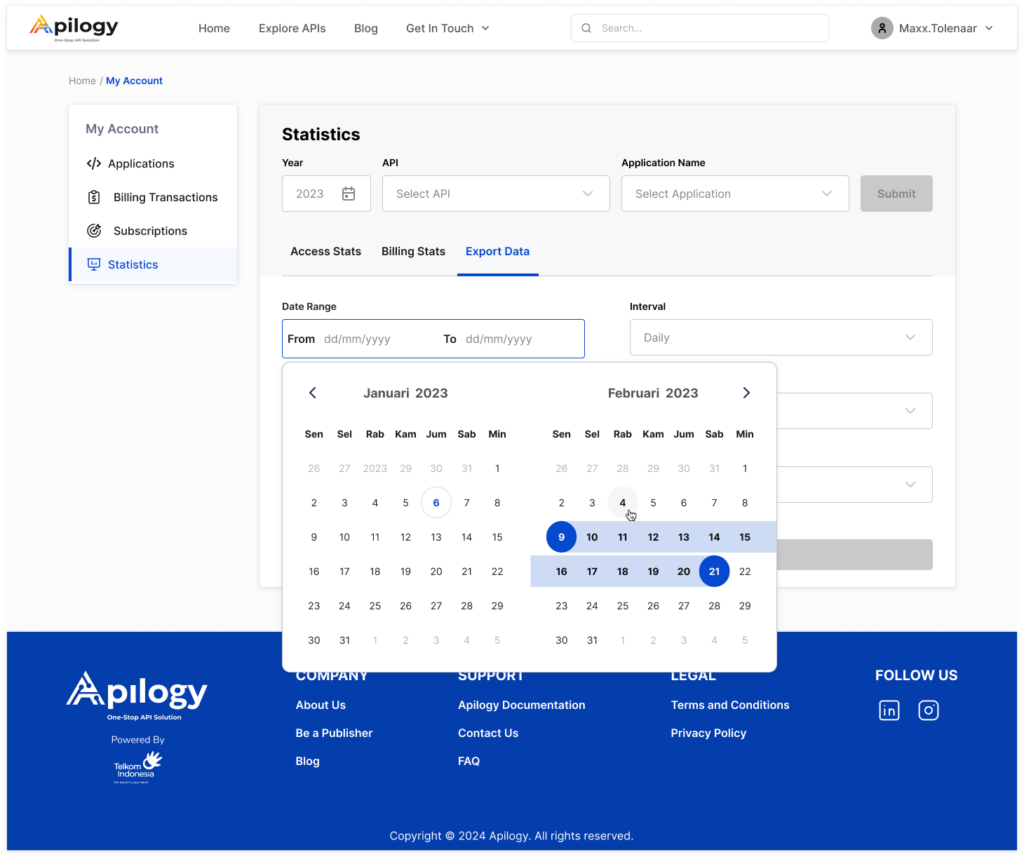
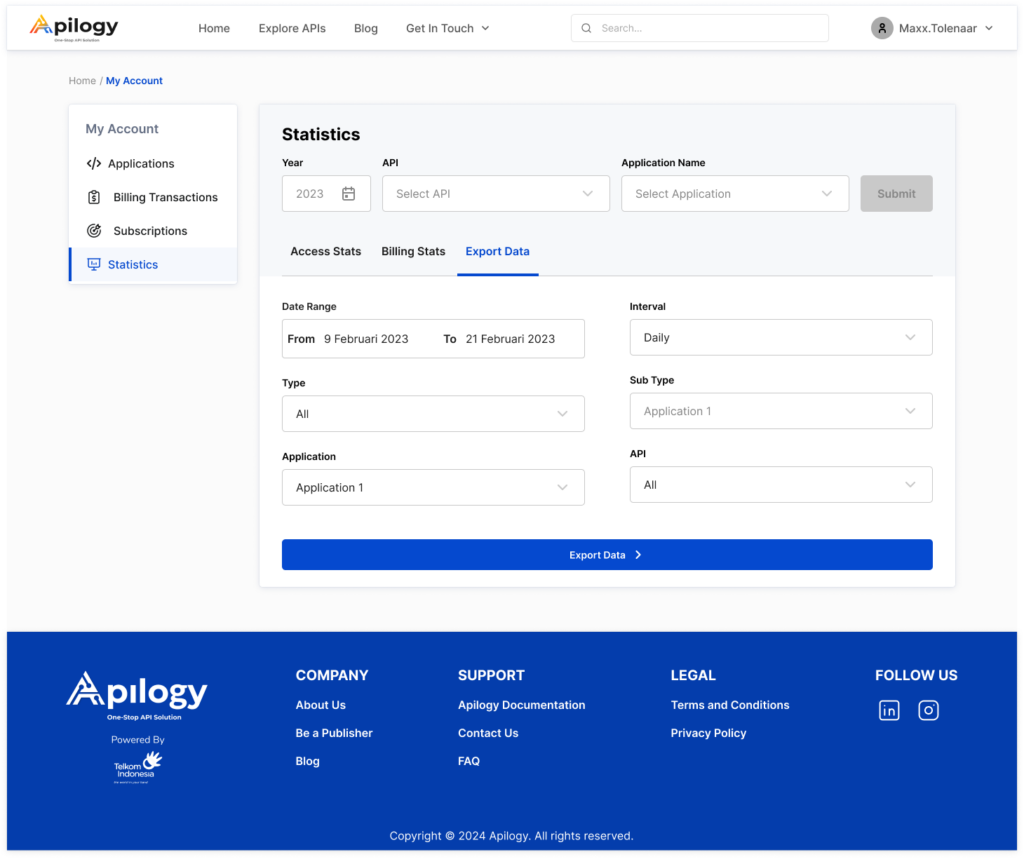
Select how you want the data frequency to be extracted in the Interval selection. You can choose between Daily, Weekly, or Monthly data interval. After that, select whether you want to export all API plan types or only the Free, Prepaid, and Post Paid plan in the Type selection. Lastly, select your Application and API. Click Export Data to start downloading your API report.
SUBSCRIBING API
Before you can integrate the API into your application, you will have to subscribe to the selected API. Apilogy provides various type of API that can be subscribed and used for free. However, there are also APIs that required a payment with a prepaid or post paid method. On the API Details page, click the Subcribe API button or go to the Pricing tab to start your subscription. There might be more than one package (subscription plan) that provided by the Publisher. Each package are determined based on API throttling method, which means that each package has a different API calls limit and you can only make API calls as much as the stated limit. There will be some information that will be shown in each subscription plan, which are:
-
- Plan Description: A brief information about the plan.
-
- Plan Subscription Limit: The amount of time you can subscribe to the plan.
-
- Active Period: The subscription period of the plan.
-
- Grace Period: An extended period of time to renew your subscription when the previous one is expired.
i. Select Package
To begin subscribing API from Apilogy, make sure you have created the Application domain. Apilogy and our Publishers provide multiple package for each API. You can select the package that would be most suitable for your application.
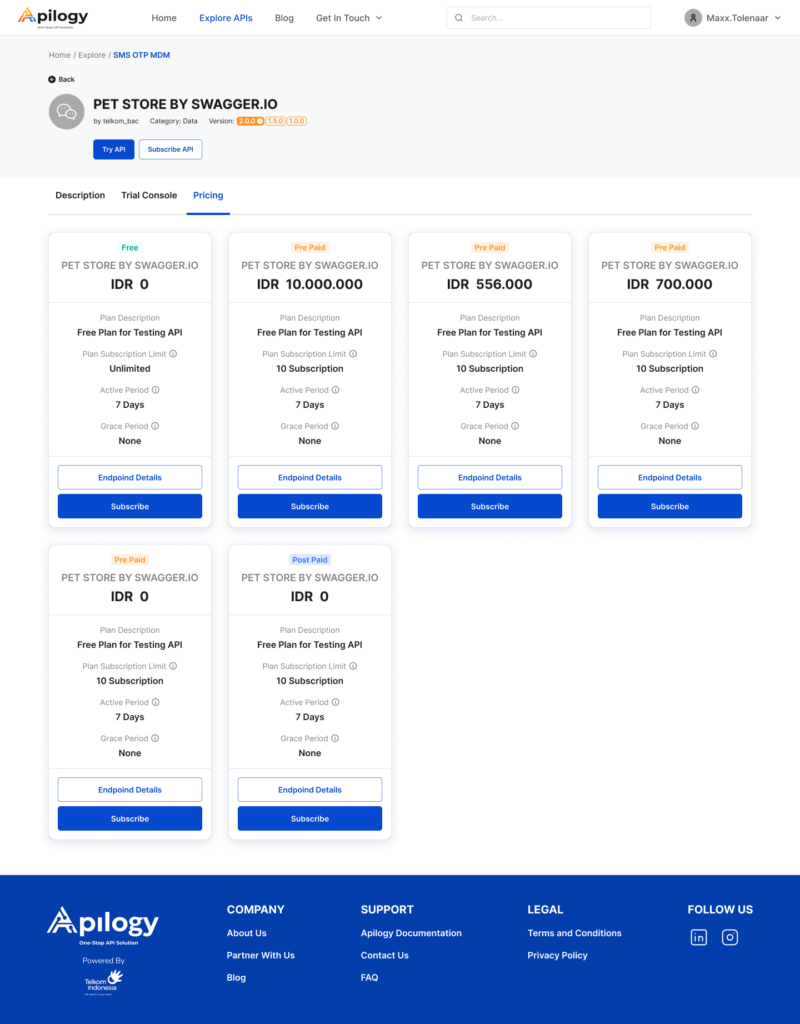
Click View Endpoint Details to know the URL that will be needed for each action on the chosen API. Each endpoint also have its own price distribution. Then, click Subscibe in one of the package you want to use. You can subscribe to multiple APIs, but keep in mind that you can only subscribe to one plan per API at a time. If you want to switch plans, you’ll need to unsubscribe from your current plan first. There are 3 (three) types of API plan in Apilogy, which are:
1. Free Plan
You won’t be charged any payment for this type of plan. There are free plan with throttling or with particular agreement. When you’re subscribed to free plan with throttling, you will have limited API calls. Meanwhile, for free plan with particular agreement, you won’t have any API call limit. But, this plan can only by used if you have met the requirements of a business agremeent between your party and Apilogy. The API call parameter will be settled along with the agreement. Contact Our Team to learn more about this plan. After you click Subscribe on one of the free API plan, select the Application Name you have created.
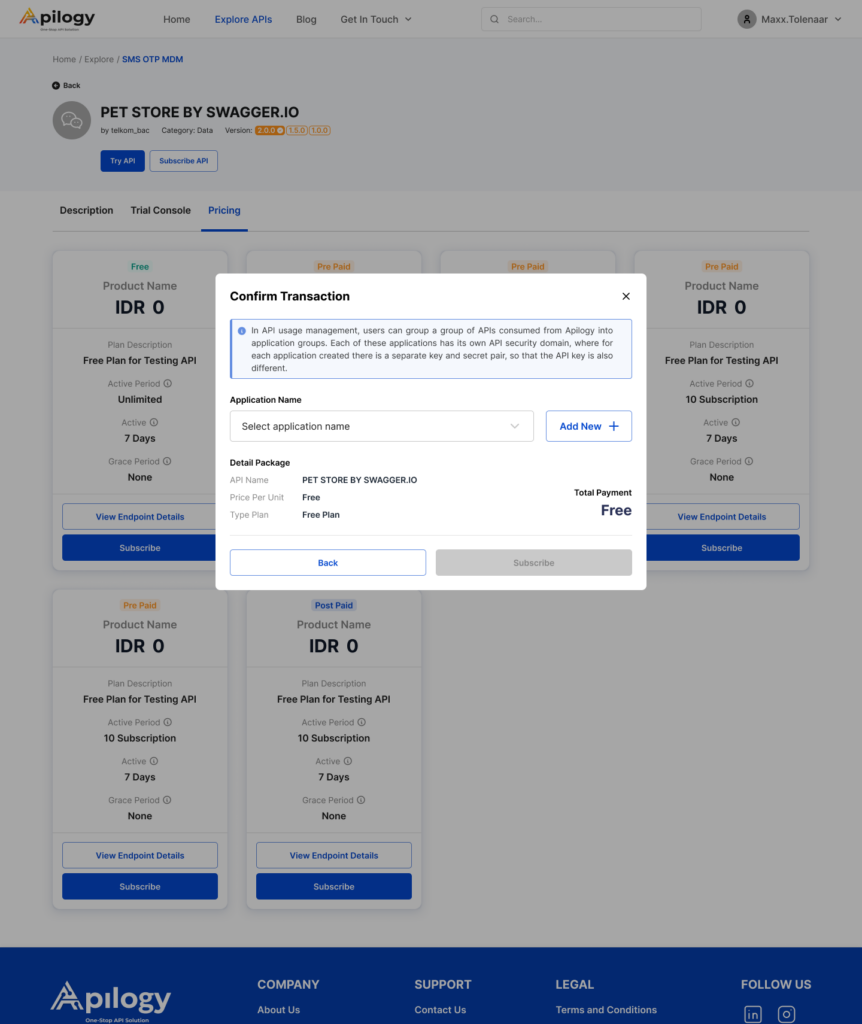
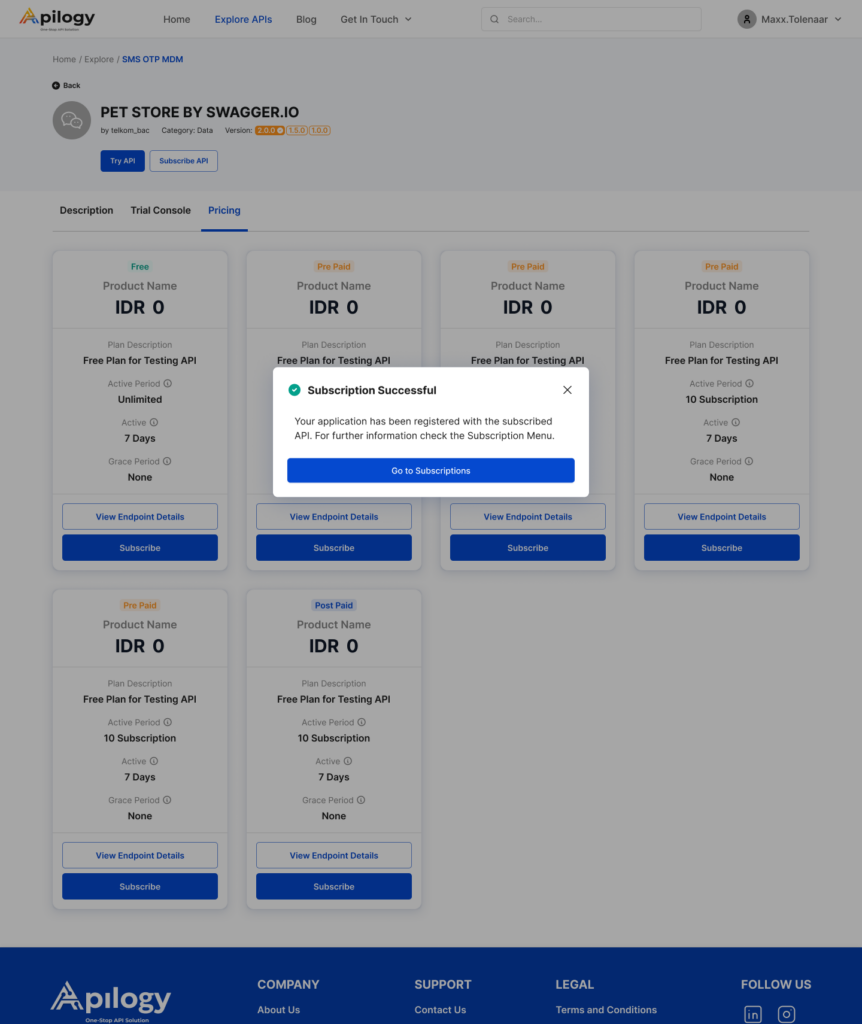
Review the details of your subscription and click Subscribe. You’re free API is now ready to use.
2. Post Paid Plan
This plan is only available for developers and publishers who have an agreement with Apilogy. Apilogy will handles API usage and traffic, while payments are handled directly between you and the publishers, outside of the Apilogy platform. Contact Our Team to learn more about this plan.
3. Pre Paid Plan
Subscribing to prepaid plan will require you to pay the subscription price before you can start using the API. The plan is based on a balance system. The balance will be used by the API gateway to grant the API access and it will decrese by the unit price for each successful API call. API call can’t be made if your balance is insufficient. Click Subscribe on one of the prepaid plan to start subscribing to the API. Select the Application Name and click Continue Payment.
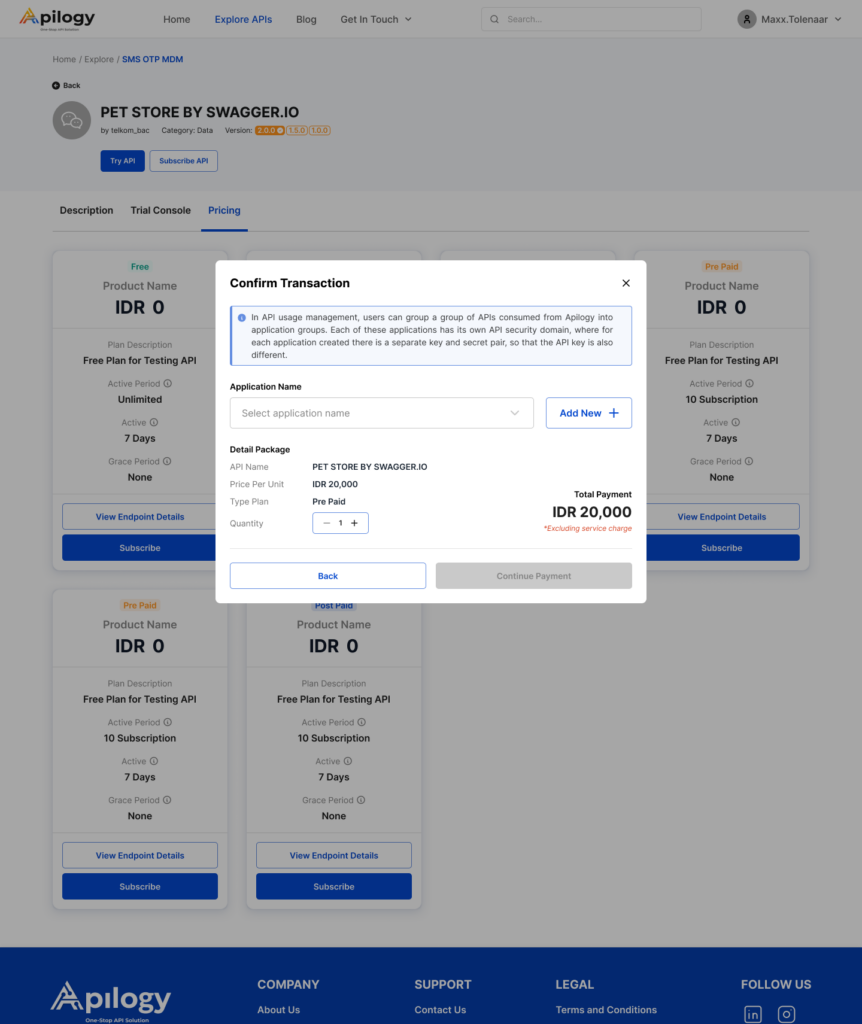
You will be redirected to the Checkout page to Edit Payment Details and Select Your Payment Method.
ii. Edit Payment Details
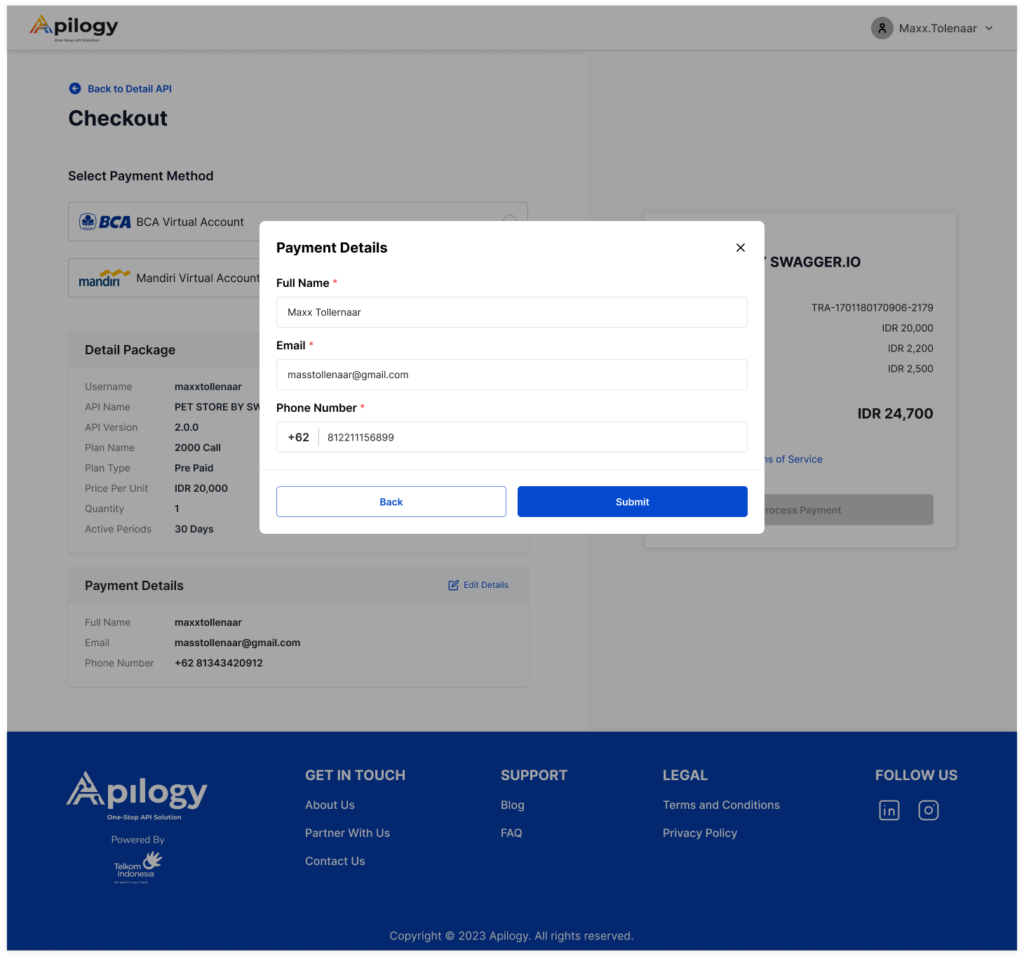
To proceed with your API order, you can review your order and payment details. Click Edit Payment Details to modify any details about your information regarding the order.
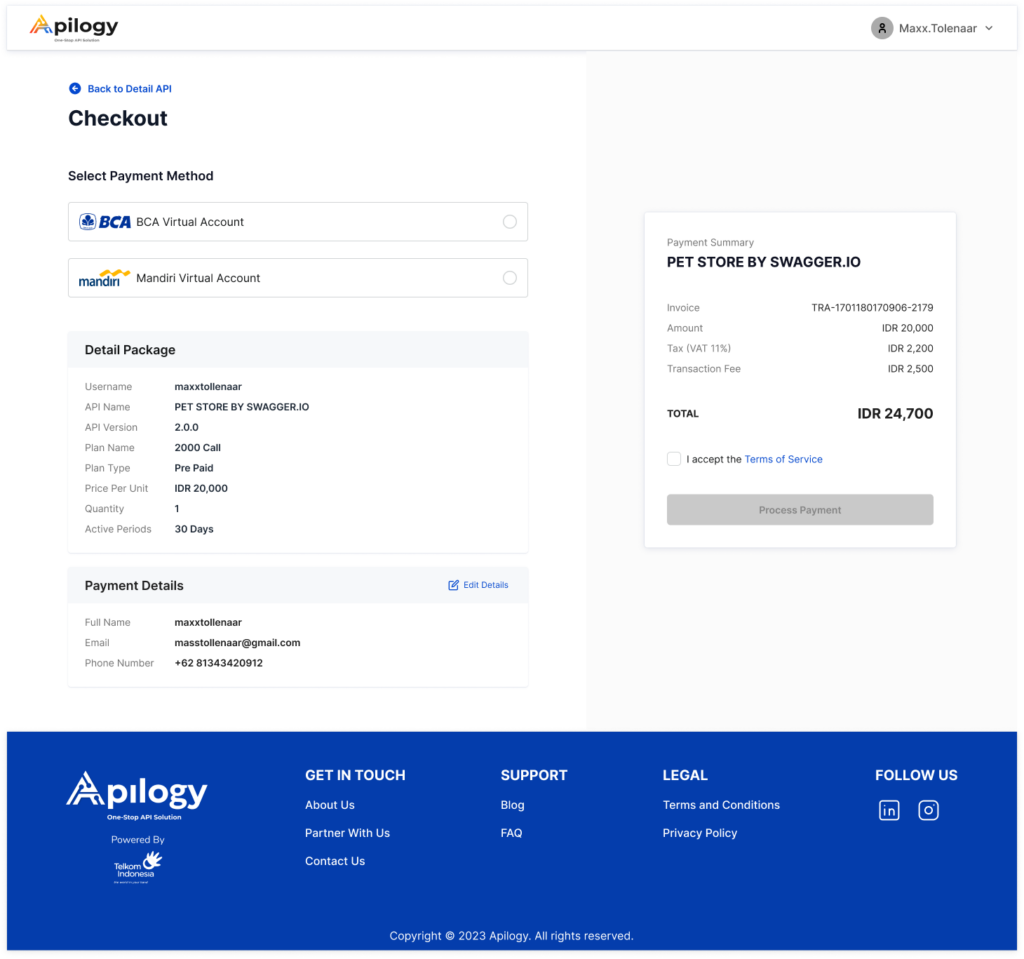
Enter the information about your Full Name, Email, and Phone Number on the Payment Details pop-up window. Click Submit to save the information.
iii.Select Payment Method
For the time being, Apilogy provides payment using BCA or Mandiri Virtual Account. Click one of your preferred payment method.
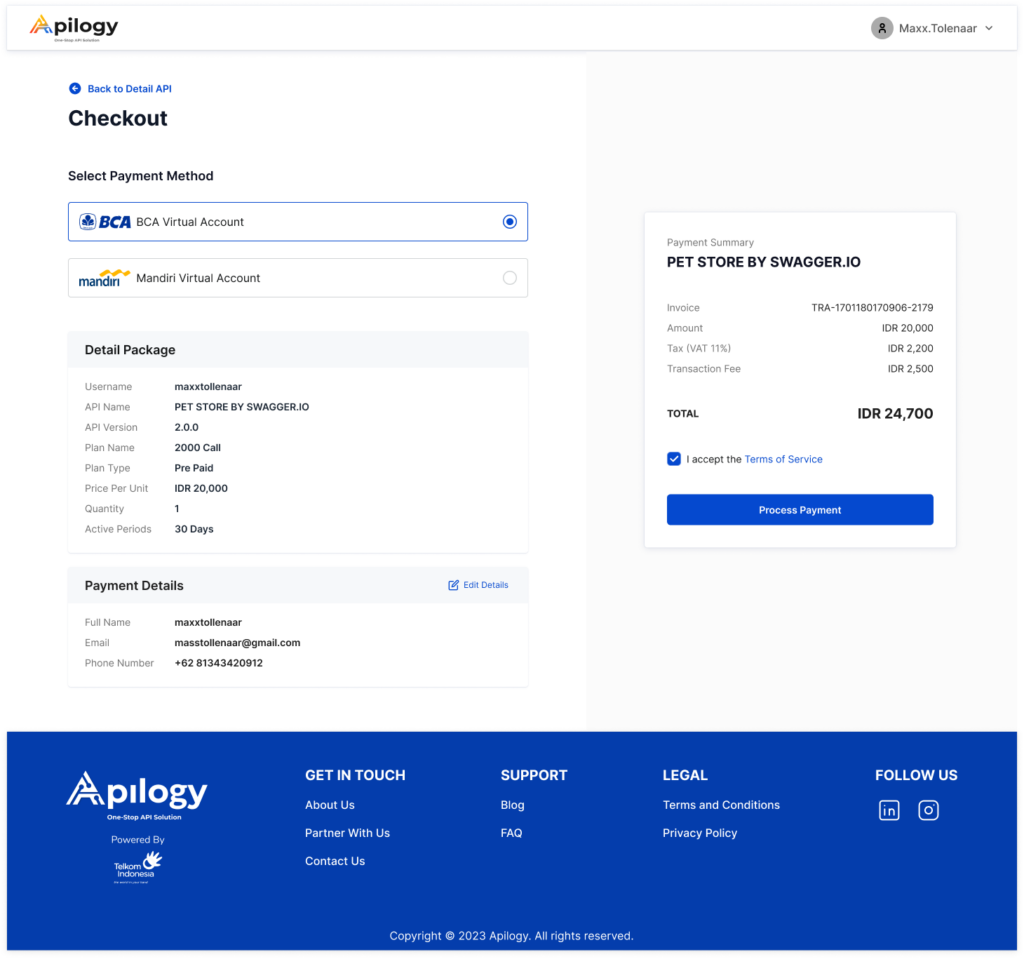
Review your payment summary on the right side of the page. Click the “I accept the Terms of Service.” checkbox before you can continue to place your order. Click Process Payment and you will be redirected to the Payment Instruction page that will show your Virtual Account Number and the Total Payment of your order.
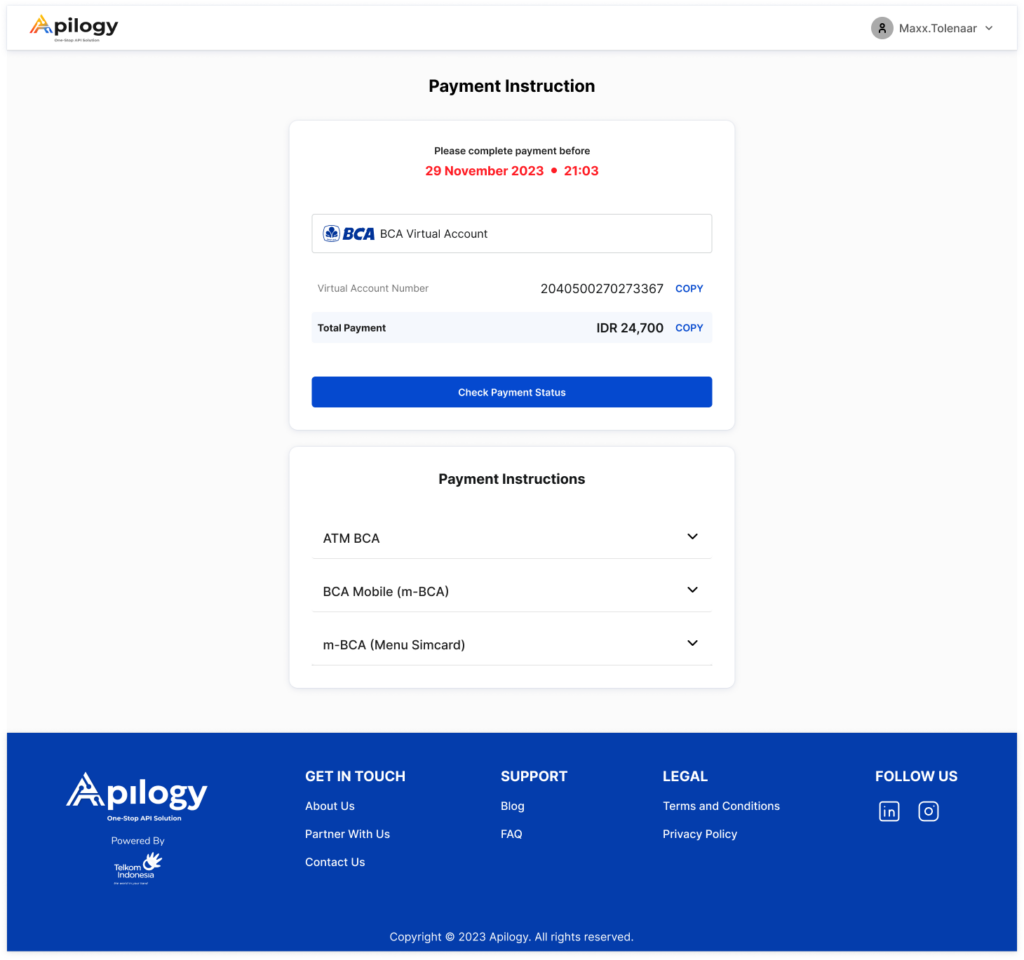
Follow one of the payment instruction. You can check the status of your order by going to the Billing Transaction page or clicking the Check Payment Status.
Modify Prepaid API Subscription
All prepaid API plans that you have purchased and subscribed to can be modified by topping up your balance or changing the prepaid to another plan that is provided by the publishers. Click your username at the right top of the page and click My Account.

To modify a specific application you can go to the Applications page and select the application you want to edit. Then, go to the Subscriptions tab on the application page. But, if you want to view all your subscriptions, go to the Subscriptions page.
i. Top Up
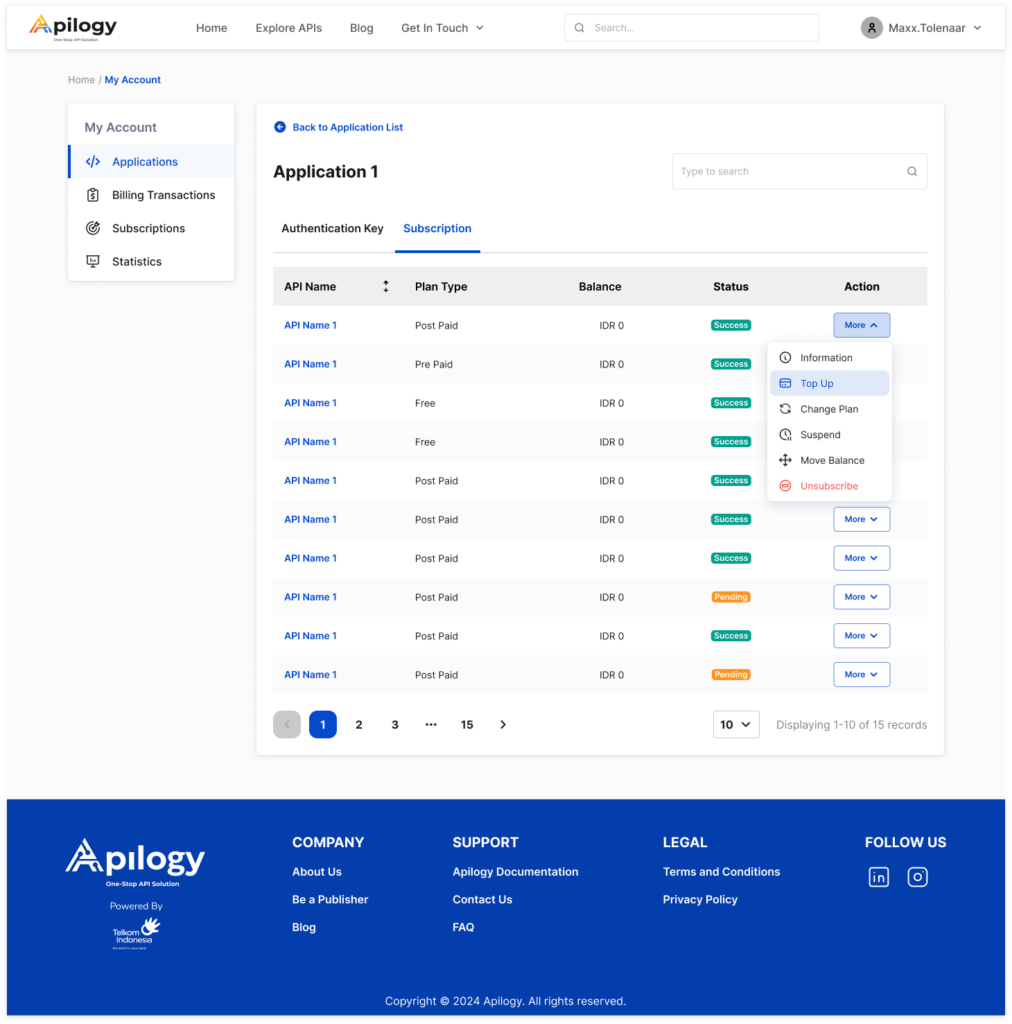
By topping up your balance regularly, you can help to avoid API calls failure. Click More on the API you wish to top up, then click Top Up.
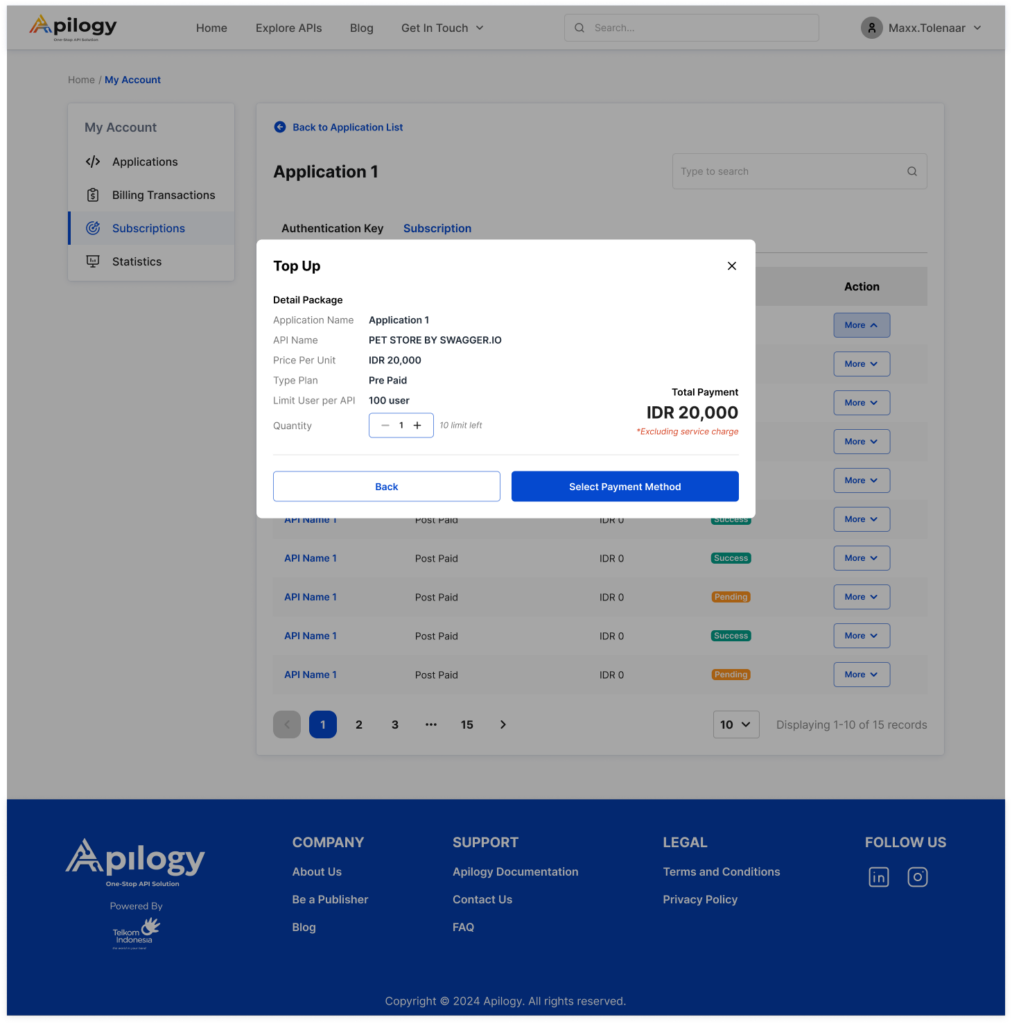
Use the + button under Quantity to increase the top up amount you want. Review your order and click Select Payment Method.
You can complete the top-up process the same way you make your subscription payment on the Checkout page. Please keep in mind that you can only top up your balance while the package you’re subscribed to is still available. If the plan is being discontinued, you’ll need to switch to another valid plan provided by the publishers.
ii. Change Plan
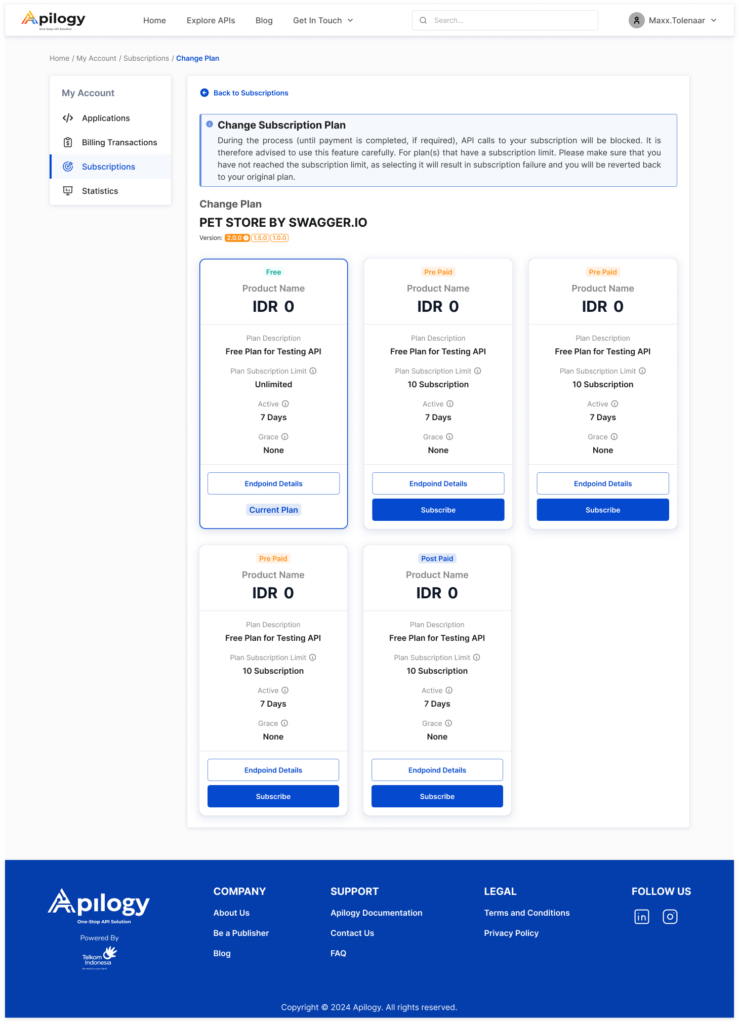
You might need to change your current subscription API plan if the plan is being discontinued by the publishers or if you want to switch to a different one. Click More on the API you need to update the plan, then click Change Plan. On the Change Plan page, you can view your current plan. Click Subscribe on the plan you want to switch to.
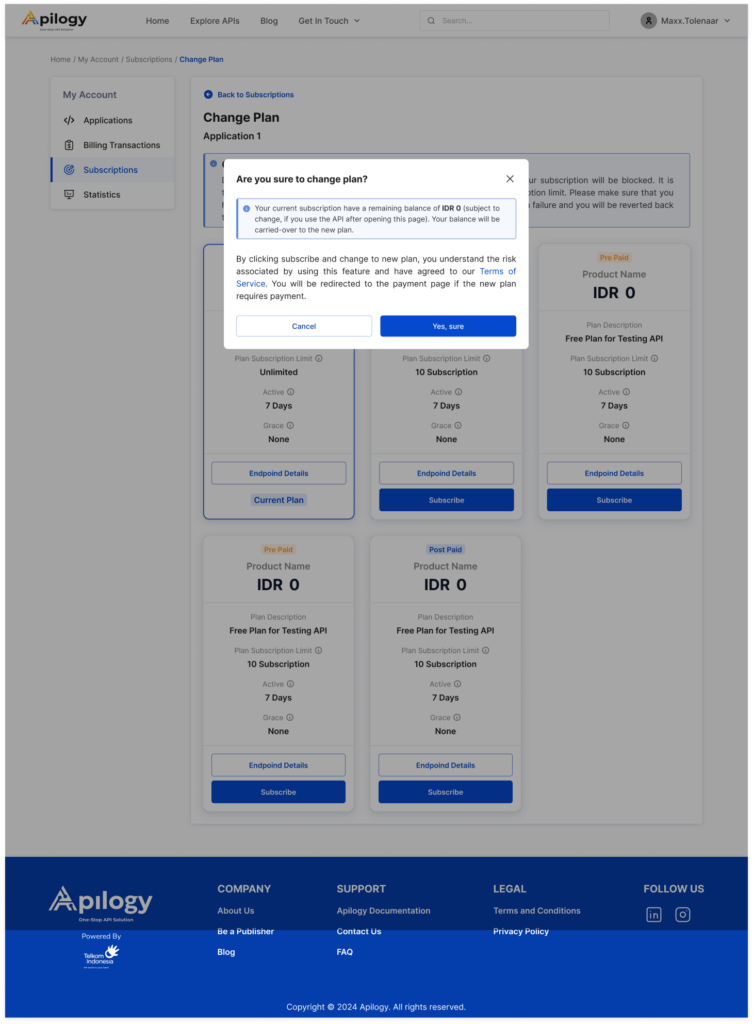
When you change your plan, your balance on the current API plan will be carry over to new one. Click Yes, Sure to confirm the change.
You can complete the payment for the plan change the same way you make your subscription payment on the Checkout page.
CONSUMING API
If you have a subscribed API, you can go to the Trial Console tab on the API page to integrate them to your application and make your API Call.
Connect and Authorize API
You can easily go to the Subscriptions menu on My Account page and click the API you want to integrate. Then, you will be redirected to the API Detail page. Apilog has multiple authentication method, but you can only use the method that is approved and provided by the API publishers. To begin integrating your API, select the application you want to try the API out on the Application Name dropdown. Apilogy provides a default application called “Hello World” to try out the API if you have not created any application yet.
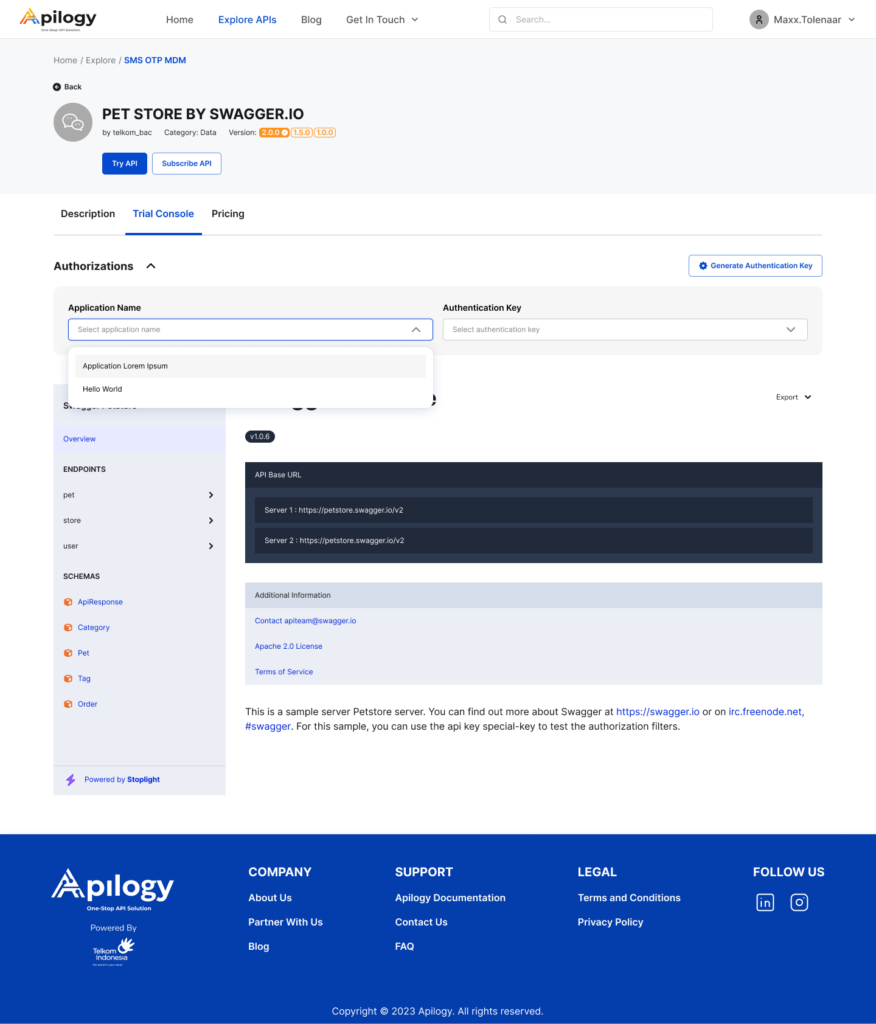
If you haven’t created any authentication key for the selected application, click Generate Authentication Key. You will be redirected to the Application Detail page to Generate Your Key. However, if you have created the key before, you can select the one you want to use in the Authentication Key dropdown.
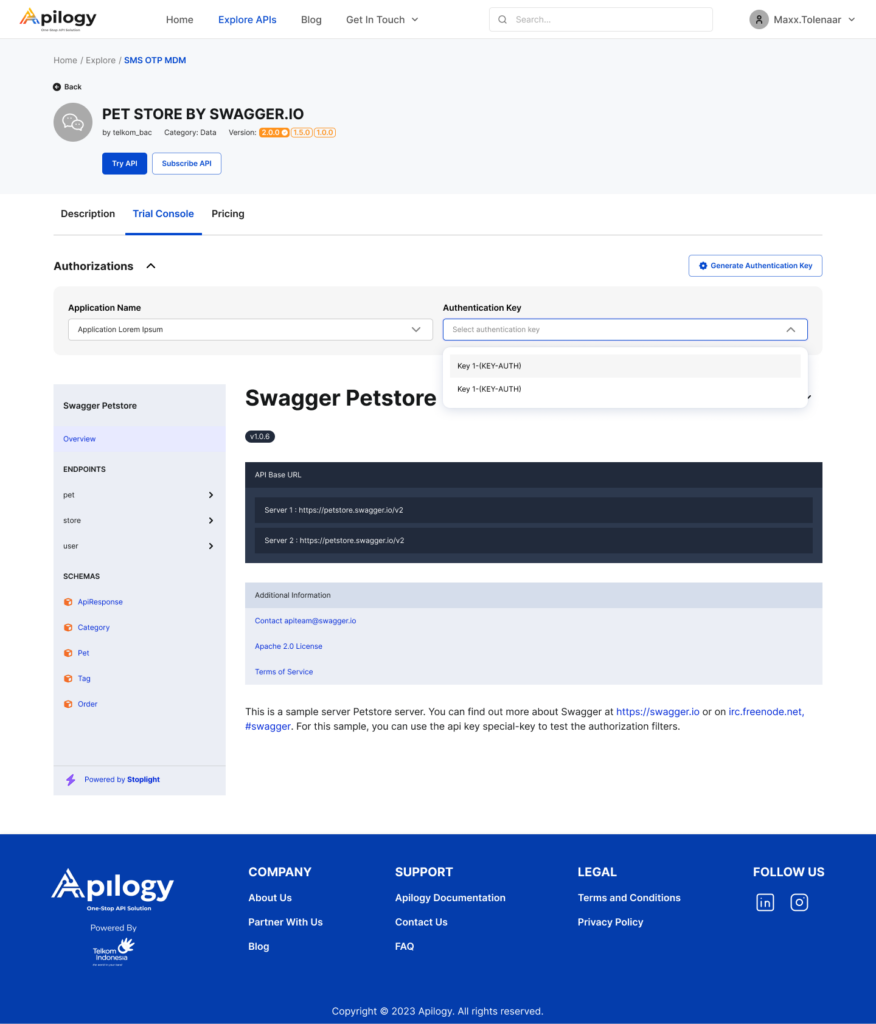
Each authentication method has a different step to obtain the header you need after you select your authentication key.
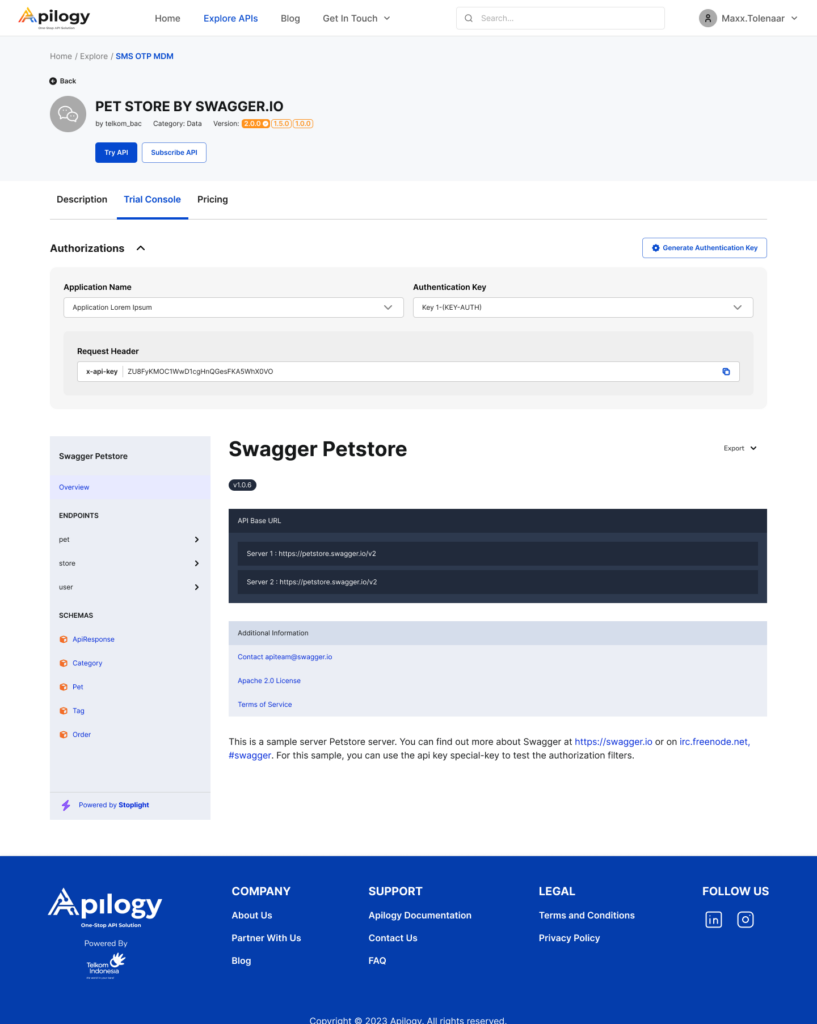
KEY-AUTH
With this authentication method, you don’t need to do any additional step because you will immediately get the requested header after you select the authentication key.
Basic Auth
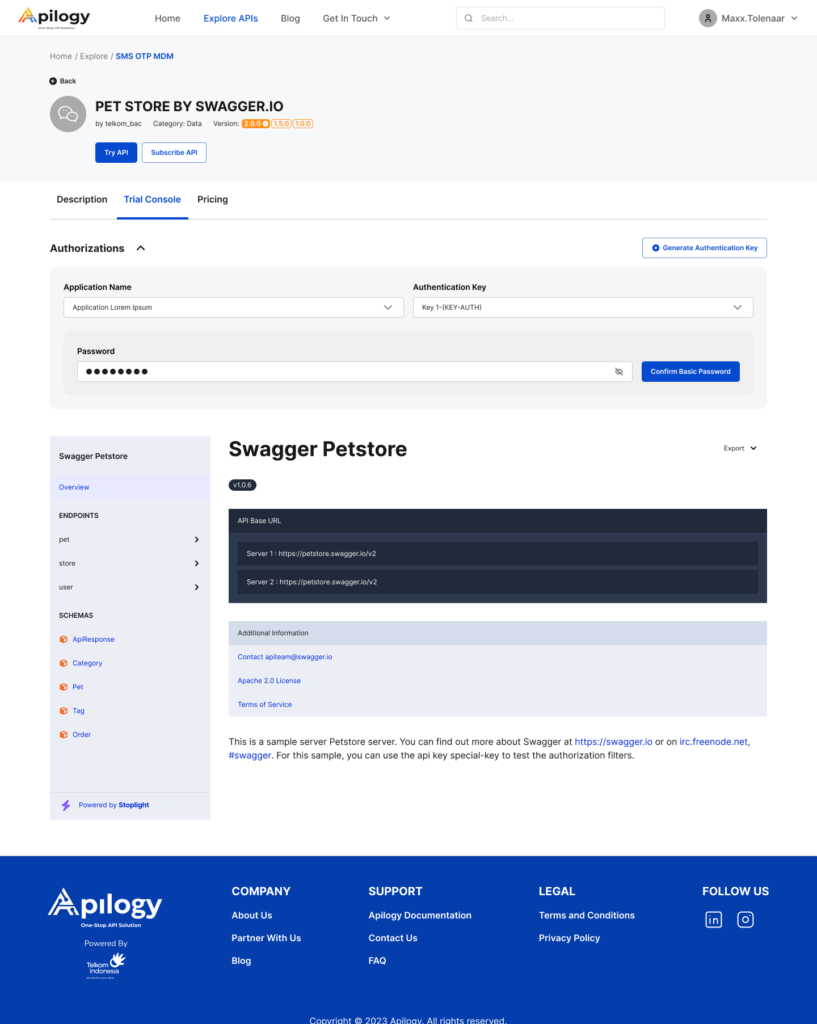
Basic Authetication will require you to enter the password you have created for the selected application as an authorization. Click Confirm Password after you have entered the password.
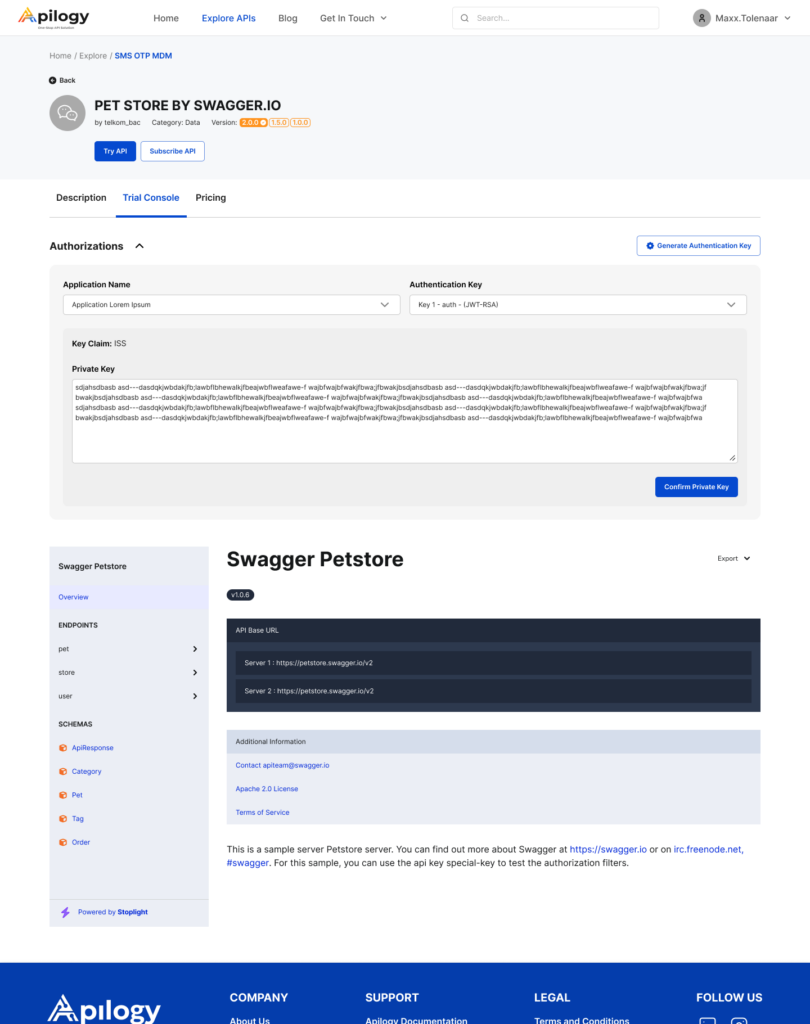
JWT (RSA)
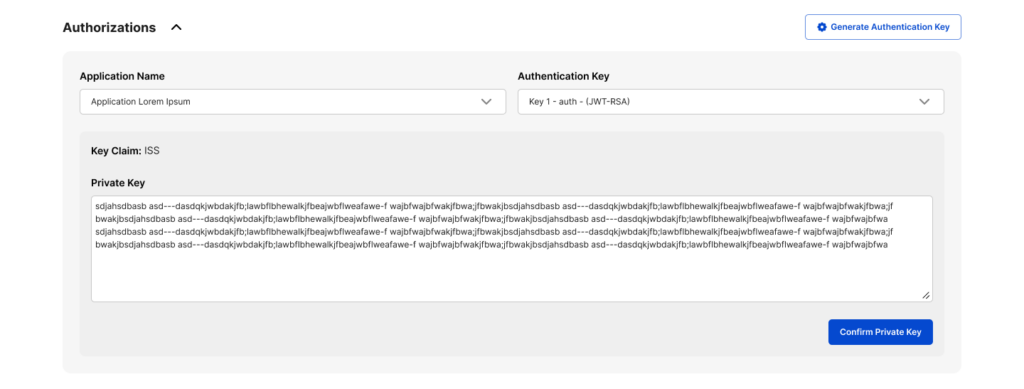
The private key used in JWT (RSA) authorization is the one that you have generated before for the selected application and key. Enter the private key and click Confirm Private Key.
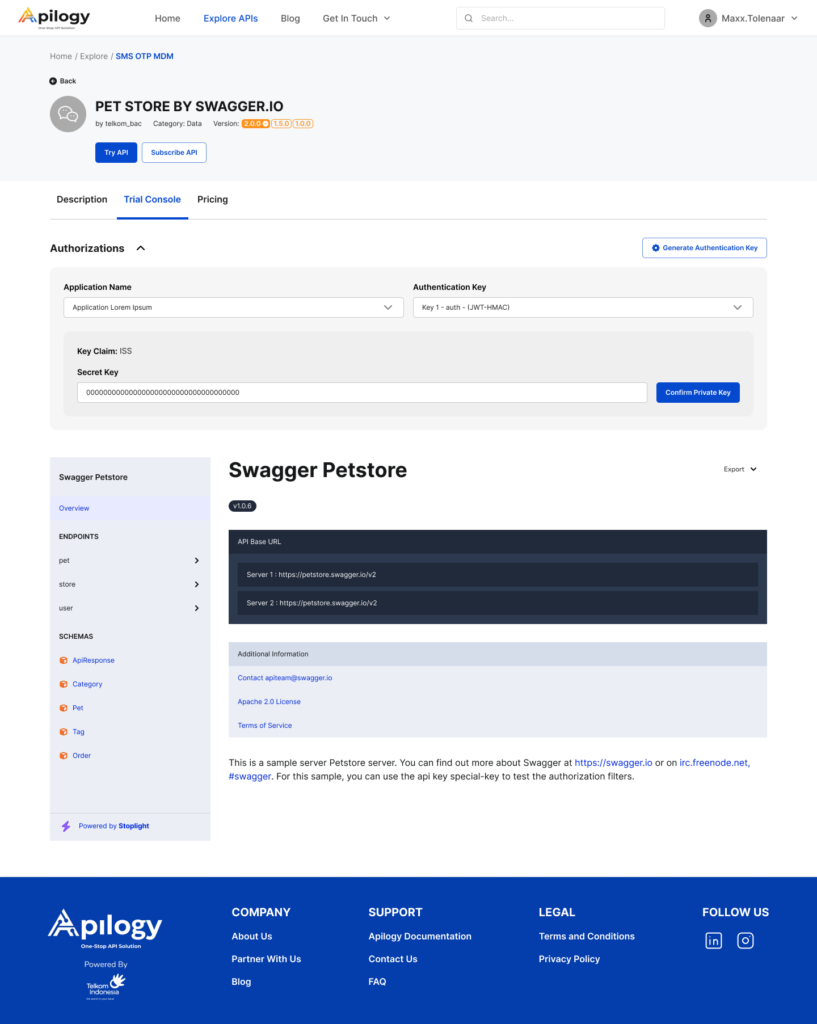
JWT (HMAC)
This method has the same step as the JWT (RSA) method that requires you to enter the secret key you have received for the selected application and key. Enter the secret key and click Confirm Secret Key.
API Call
API calls in Apilogy is created when you confirm your authorization using the key or token needed. Once the authorization has been succeed and approved by Apilogy, you will receive the response in the Trial Console page. The response will be generated in the Request Header field.
KEY-AUTH

BASIC AUTH

JWT (RSA)
JWT (HMAC)

You can copy the request header and use it on your platform to finish integrating the API.To learn more on how to modify your subscription, please refer to the table of contents at the top of this page.
Kunjungi website serta media sosial Apilogy dan temukan artikel menarik lainnya!


